How to Optimize Windows 10 and Windows 8/8.1 to Run Faster
PC Guides, Windows 10, Windows 8, Windows 8.1You might have observed after a fresh install how a PC operates, in particular, the recently updated Windows 10 Anniversary Update. If you have already modernized your machine from older Windows to this newer version, you do not need to wait for it being slowed down. It is better to be preventive than being curative. Take measures ahead of time to avoid inconveniences in the coming future.
For common PC issues, Junk files unclogging, boosting System performance, speeding up Internet and other underlying Windows concerns, we recommend using this tool.
- Step 1 : Download Systimizer ‒ PC Cleaner & Internet Booster (Effective with Windows 10, 8, 7 & XP)
- Step 2 : Click "Scan" to analyze your PC
- Step 3 : Click "Fix" to wipe out all bumps
This article will advise you with certain tips, applicable on Windows 10 as well as Windows 8(8.1), which can stop unwanted activities leeching the resources out of your system. These techniques are easy to perform and of high utility. Make your Windows components captive of your will, rather than doing stuff on their own. Consult the following areas to optimize Windows 10 and Windows 8(8.1).
- Remove Junk Files
- Clean up Registry
- Time-wasting Animations Killing your PC
- Windows Background Services
- Adjust your Windows Startup Setting
- Optimize Hard Drives
- Manage Power Settings
- Keep your PC on Sleep Mode
- Bad Sectors in Hard Disk
- Unnecessary Features in Folder Options
- ReadyBoost to Increase the Memory
- Boot Straight to Apps screen or Desktop screen
- Elevate CPU Priority
Remove Junk Files
Junk files load your system with unnecessary burden. These are the temporary files, which accumulate with the usage of computer. The concerned issue might have resulted due to such momentary information with mischievous nature. In order to resolve the situation, clean the directories with temporary data using a dependable junk cleaning utility. Investing in such a tool will save you a lot of time and money.
Clean up Registry
Working with Windows components and third party programs/applications frequently has a direct impact on Windows Registry database. This database can intake thousands of invalid or corrupt entries decelerating the speed of your computer. To inhibit this, keep a routine maintenance of your registry via a free registry cleaner compatible with most versions of Windows. This will help you in assuring error free registry records.
Time-wasting Animations Killing your PC
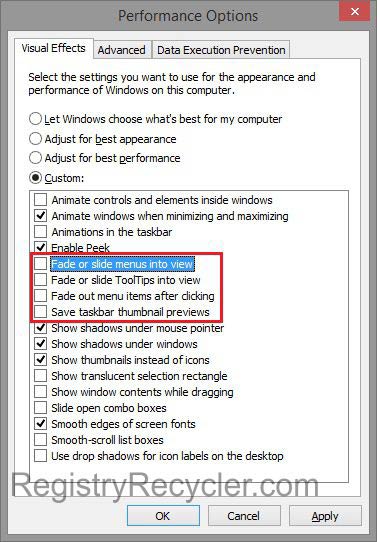
Operations filled with effects and animations may give a magical view to the system, however, these can seriously cause your PC to operate in a sluggish behavior. Turn off such simulations to observe a prompt response to your commands. The procedure of doing so is same as it was in Windows 8, stated below.
- On Start menu/screen, type View advanced system settings
- Once found in the search, click to open
- On the Advanced tab of System Properties dialog box, click Settings under Performance
- Here you can uncheck some performance options such as:
- Fade or slide menus into view and Fade or slide ToolTips into view, etc.
- Apply and OK to exit Performance Options window
Windows Background Services
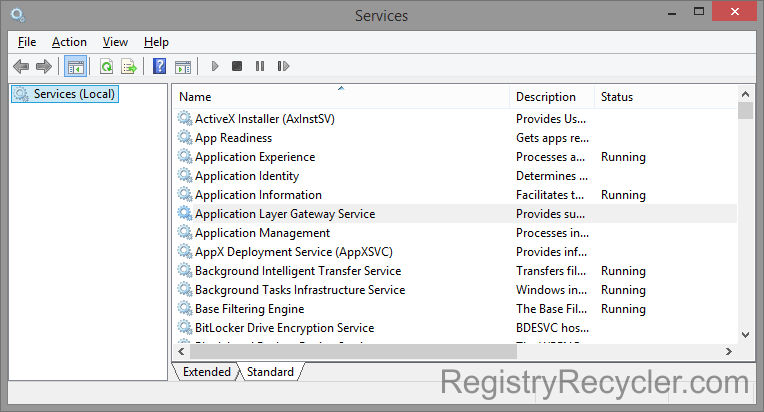
Both Windows 10 and 8 run several background services to carry a successful login session. For this purpose, services are automatically started, soon as the user logs in and are then readily available at the time of call. However, these services may not be used through the entire login session. Such loaded but unused services are simply a waste of resources as these eat up the memory to stay active. Stop these services from being loaded on startup and save your means to get an optimum speed, as this would assist the heavy operations, like gaming, to run smoothly. Achieve the state of limited services in the following manner.
- Proceed to Start screen/menu, type ‘services’ and open Services
- Locate the services listed below, and double click to access their Properties
- Application Experience (changed to task in Windows 10), Diagnostic Policy Service, Distributed Link Tracking Client, IP Helper, Offline Files, Program Compatibility Assistant Service, Portable Device Enumerator Service, Secondary Logon, Security Center, Windows Error Reporting Service, and Windows Image Acquisition (WIA)
- On the General tab next to Startup type, choose to set Manual
- Click Apply and OK
- Repeat it in case of each service noted above
- Close Services Configuration
Adjust your Windows Startup Setting
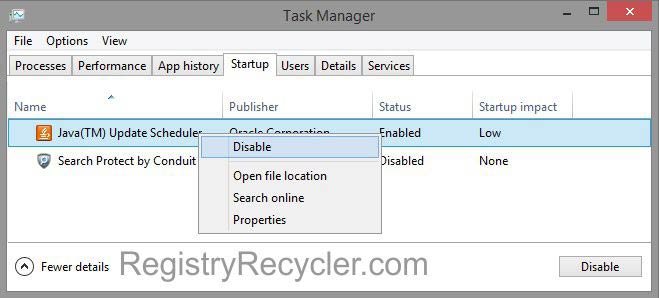
Windows 10, as well as Windows 8 let their users to manage the startup items from its concerned tab in Task Manager. You can make the Windows run faster by limiting the startup to items of basic use. This will optimize Windows boot up and save your time in having the system ready.
Optimize Hard Drives
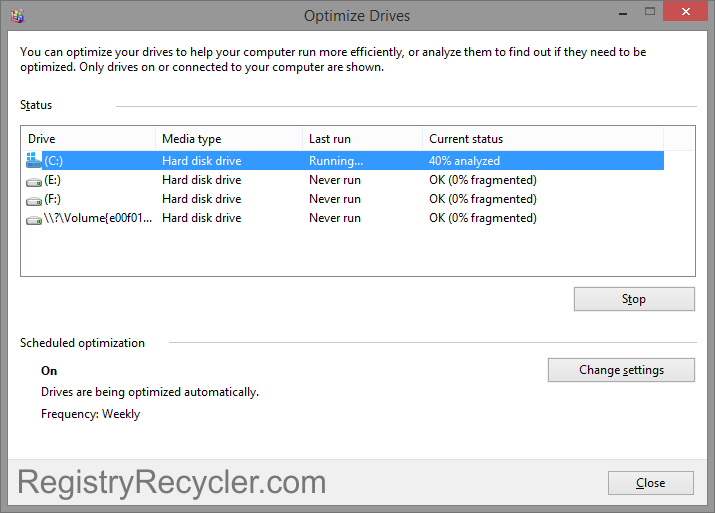
To execute each of your commands, the RAM regularly consults with your hard drive. It happens so, because every required file, whether it is a Windows system component or an essential to run your application, is placed on your hard drive. A diminishing hard drive, therefore, can surely cause your PC to intake issues. Analyze your hard drives and defragment these, if needed, to achieve a higher performance in the following way.
- Type defrag in Start screen/menu
- Locate and select Defragment and optimize your drives in the search results
- Optimize Drives window will appear listing all your drives
- To view the Current status of a selected drive, click the Analyze button
- If you find your drive fragmented, click on the Optimize button to start defragmentation
The above lines are just one word of advice aimed at (non-SSD) drive optimization, for further guidance ensue the underneath guides,
Hard Drive Optimization Tips and Tricks
How to Optimize Solid State Drive (SSD) on A Windows PC
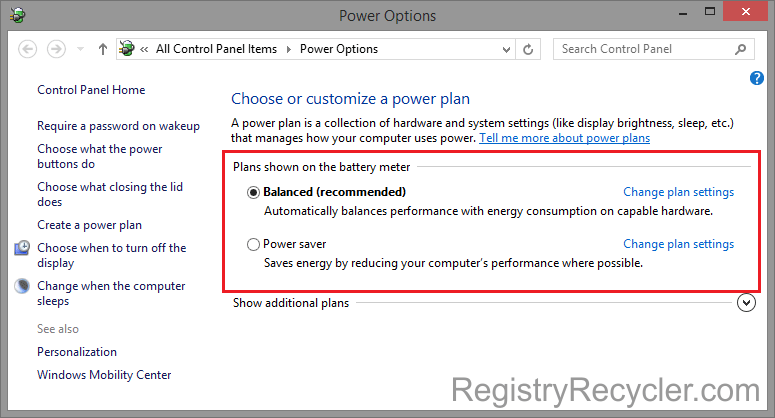
Manage Power Settings
Principally, modern Windows OS Power Options screen provide you with same three alternative choices. These are Balanced, Power Saver, and High Performance. Opting for a balanced power plan would automatically stabilize between energy consumption and system performance, while the power saver option saves the energy by compromising on system performance at instances. Choosing a high performance power plan would prefer system performance to the optimized energy usage. You can choose different options among these at different occasions to attain what is desired. Perhaps, using the high performance option while playing games, and toggling back to balanced or power saver after the gaming session could work sanguinely.
Keep your PC on Sleep Mode
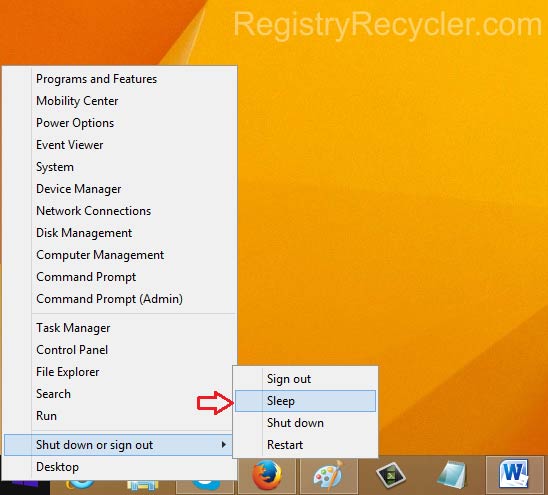
Windows 10 has quite a similar sleep option to Windows 8.1, aimed for highly convenient performance. However, the rejuvenation of Start menu has made it easy to access this option in Windows 10. You can put your PC to sleep instead of shutting down. This will store your current activities into the RAM and quickly retrieve on resuming back from sleep mode. This is an optimized practice to rescue your PC from an idle state. In Windows 10 for sleep option, you can simply click Power icon on Start menu and select sleep from the appearing submenu, while steps for Windows 8 are mentioned below;
- Right click the Start button on your desktop screen and point on the Shutdown menu
- Click on the Sleep option to direct your system for this feature
- Alternatively, click Settings icon on the Charm bar to view the settings panel
- Below in this panel, click the Standby button to view more options
- Choose Sleep among these options
Bad Sectors in Hard Disk
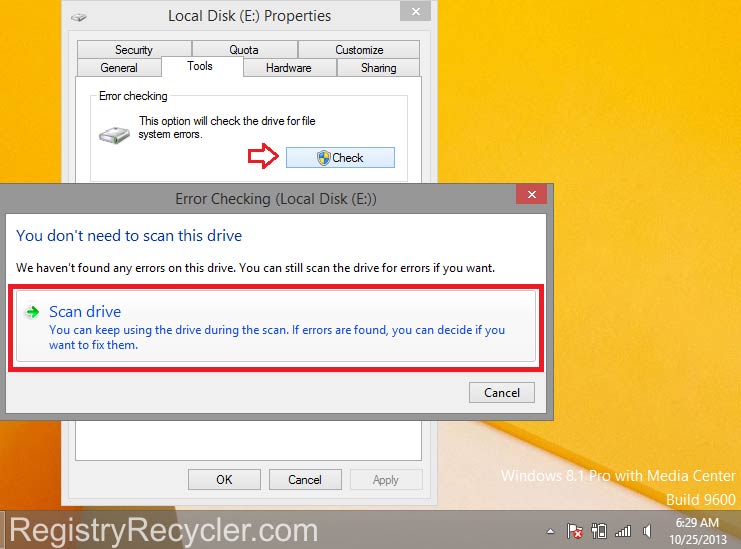
Whether you have inducted a newer Windows on an older hard drive or not; it may trigger errors and act slothfully right from the beginning. In such a situation, check your hard drive against bad sectors and errors. Windows 8 & 10 lets you inspect for such elements and rectify these if possible. In the other case, you may have to replace your hard drive. To run the scan,
- In Windows Explorer, right click your drive and go to its Properties
- To detect errors, click the Check button on Tools tab
- On the prompted dialog box, click Scan drive and the scan will start
- OR, open Command Prompt (in administrator mode) by typing CMD on the Start screen
- Type the command line ‘CHKDSK /F /R’ in command prompt black window and hit Enter
- On receiving the next message, confirm by typing Y and hitting Enter
Unnecessary Features in Folder Options
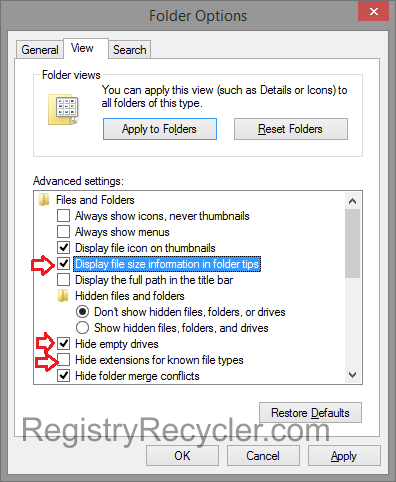
Windows Explorer in both (Windows 10 & 8.1) versions of Windows, is a fully loaded utility with many options enabled by default. Some of these enabled selections may benefit you, while some may depict a negative impact. Figure the ones with inverse relation to your system performance and disable these. In order to do so,
- Open Windows Explorer, click on the Options button under View tab in the Ribbon
- Access the View tab in subsequently appearing Folder Options window
- Clear the Check boxes next to the following options
- Display file size information in folder tips, Hide empty drives, Hide extensions for known file types, Show encrypted or compressed NTFS files in color, Show popup description for folder and desktop items
- Click Apply button and close Folder Options
ReadyBoost to Increase the Memory
Speed and performance of a computer majorly depends on its primary memory. The system will be able to upkeep the performance and carry operations without delays and pauses, when RAM has enough memory to incorporate even more MBs or GBs of data. However, a shortage of memory will result in cache overflow, forcing you to end some of the currently running processes. To overcome such shortage, you can either find a permanent solution (buy a RAM with high capacity), or utilize your USB storage drive. Once you have such drive with available space not less than your current RAM capacity, you can perform following actions to use it as a RAM.
- Connect a USB storage drive with required GBs of empty space to your computer
- Right click the drive icon in File explorer and go to its Properties
- In Properties window, access ReadyBoost tab and click Use this device
- Under Space to reserve for system speed, you can choose what Windows recommends
- Click Apply and then OK to save your changes
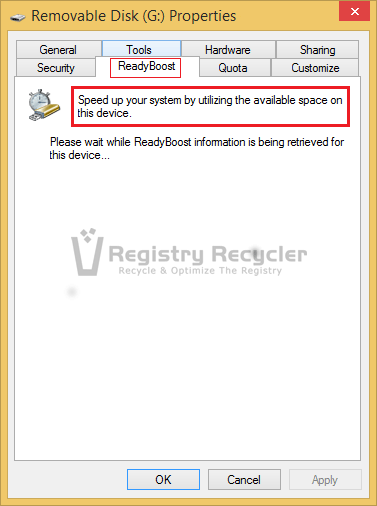
It should be noted that removing the memory drive while it is being used as ReadyBoost, might result in serious data loss. Before you remove the drive, go to its Properties on ReadyBoost tab and choose the option Do not use this device. Only then can you safely remove the device.
Boot Straight to Apps screen or Desktop screen (only Windows 8 and 8.1)
The first place where Windows 8 and 8.1 take you on starting up is the Start screen. This screen however is generally perceived to be suitable for tablets and touch screen devices. Being a desktop PC or laptop user, if you are not liking the standard Start screen with live apps displayed first, you can customize it to your own preference. Boot either directly to your desktop or to a detailed Apps view on Start screen. Follow the given steps in this regard.
- Right click an empty place of your Taskbar and go to its Properties
- Access Navigation tab on the Properties window
- Under the Start screen section, check the Start screen section, check the option saying When I sign in or close all apps on a screen, go to the desktop instead of Start, if you want to view the Desktop screen on boot up
OR - Check the option Show the Apps view automatically when I go to Start, and let the above noted option unchecked, if you want to boot with Start screen showing your Apps
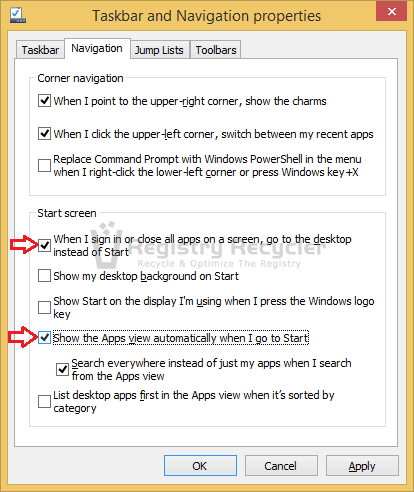
You can check both the options at a same time. Consequently, you will be taken to Desktop screen on booting up. Whereas, all Apps will be viewed every time you access your Start screen.
Though this method is not enduring and not primacy recommendation as well but you can purse this tip given the supremacy of your urge. Every application that you are currently running is your active process. By default, every process in your system is set to a Normal CPU priority level, which means it is allocated with same amount of system resources as do the other processes. However, some of these processes are primary while the others are secondary based on your current use. The CPU priority setting is adaptable and can be altered. If you are running multiple applications at a time, set a high priority for the processes of your primary programs and low priority for those secondary. To accomplish this,
- Right click your Taskbar and choose Task Manager
- Go to the Details tab and identify your preferred processes
- Right click these processes, point cursor on Set priority, and choose High
- For the less concerned applications, right click them and Set priority to Below normal or Low
- Close Task Manager window
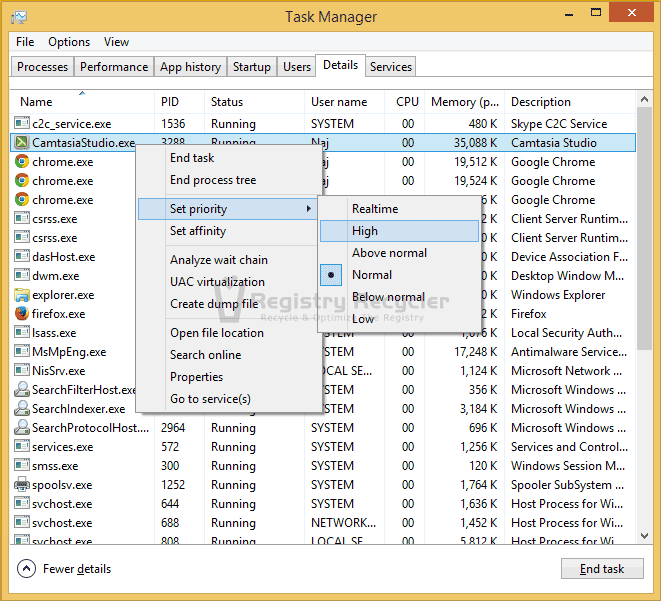
Please note that the set CPU priority level will be effective until the application is closed. On the next launch, application will automatically start with a Normal CPU priority level.
Treat each of these tweaks individually to fix the speed issues of your Windows 10 and Windows 8(8.1). Each tip will contribute in eradicating the slow running behavior of the system; however, executing all of them will surely depict a higher impact.
 Ways to Speed Up Windows 7