To respond a PC that denies even to turn on is really annoying. You can only react to the situation, if you know where the problem origins from. Whether you have noted or not, the system indicates its symptoms in its own language, the beep codes.
For common PC issues, Junk files unclogging, boosting System performance, speeding up Internet and other underlying Windows concerns, we recommend using this tool.
- Step 1 : Download Systimizer ‒ PC Cleaner & Internet Booster (Effective with Windows 10, 8, 7 & XP)
- Step 2 : Click "Scan" to analyze your PC
- Step 3 : Click "Fix" to wipe out all bumps
However, the way it beeps can be interpreted differently at varying occasions. Find a complete guide on how to decode the AMI BIOS beeps into an understandable issue. If your PC has BIOS other than AMI, you can search the relevant tips on web. Once you have recognized the element making trouble, you can consult the following resolution procedures.
These troubleshooting methods do not involve any virtual fixing tools, but are related to the hardware. However, before the application of such means, you must be aware of the implicated sensitivity, while working on motherboard. These steps recommend removing physical parts on your mainboard, and thus, require extra caution.
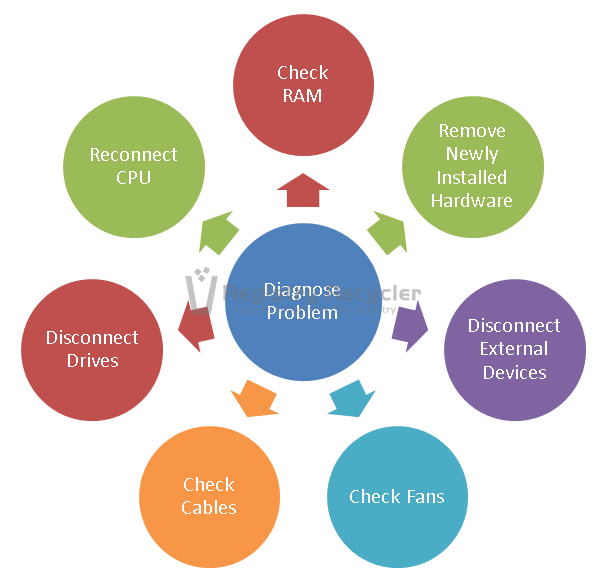
After applying each technique, turn on your PC and see if the issue resolves.
Remove Added Memory
If you have seated a new memory stick on your motherboard before experiencing the beeps, remove that specific device and leave the system with the older one. Power on your computer and observe if the system still starts with a beep. If it does not, it was due to the new addition.
Reseat Memory
Whether it is the new one or the older, open the computer case and remove all the memory sticks attached. Now reseat all of them one by one making sure that all of these are properly settled on the concerned slots or controllers. Sometimes loose or dislocated hardware can cause such an issue.
Swap Memory location
There is a possibility of both corrupt memory and corrupt slot. If you have a single memory connected, remove it from its current location and plug it in into another slot. If you have multiple memory sticks, remove all of them, and reconnect only one. If the issue persists, change its location. If it is still unsettled, replace the memory stick with one of the others one you have and turn on the computer. Moreover, do try to change the slots each time. If it is still not helping out, neither your memory stick nor the slots are acting bad.
Try another Computers Memory
Navigate to your surroundings. If you have an easy access to another computer, open it up and snip out its memory, which is already working fine. Be advised to get the same memory type to the one you are replacing. Place it in your computer and turn it on. In case of irresolution, plug out the memory and place it in a different slot this time. Furthermore, connect your own memory stick in an empty memory slot of the other computer that was already in a good working state. If the other computer triggers no issue in turning on and booting into the operating system, you have an acceptable memory device. The trouble detected in this scenario is with your memory slots. You would have to repair the slots or even a motherboard.
Remove New Hardware
If you have recently amalgamated any new hardware to your computer, it might be responsible for the beep issue. Try by removing the recently connected device and make the system run without it. On doing so, if the system runs properly, this means either your hardware is not compatible to the motherboard or it is faulty. Replace the new device with a compatible one.
Disconnect External Devices
Make sure your system ports do not have any external devices connected to them. Remove all memory sticks from USB slots, eject discs from your CD/DVD drives, and disconnect any external hard drives attached. Leave the monitor being connected, as if the issue resolves, you could be able to see Windows loading up.
Check Fans
Check all fans attached to your computer. Sometimes, an overheating system also denies starting up with alarming beeps. The first fan to be tested is CPU’s heat sink fan, which aims to moderate your CPU temperature. There could be fans associated with GPU and Power Supply.
Check Cables
You will see many cables on opening up your system casing. These cables are used to connect hardware devices to your motherboard. If a cable is not connecting hardware to the motherboard, or forming an improper bridge between them, the system will probably not move further than the initial startup. Make sure all the cables are well seated and are not damaged or burnt.
Disconnect Drives
Remove the current hard drives from your motherboard or replace the hard drive cables and observe if the situation changes. You can also check your own hard drive on another running system and check your controller by connecting the hard drive of another computer. If your drive works well at the other place, and the other drive does not work on your system, there is a problem of damaged controller. However, in a reverse case, you would have to replace your hard drive with a new one.
Disconnect and Reconnect the CPU
A high level of risk is involved in carrying out such activity. Try it only if you have much familiarity with the hardware and mainboard. Remove the processor from your mainboard, wait for a while and plug it back in. Remember to apply thermal paste on the processor before placing the heat sink. Start the computer to see if the problem is terminated.
After all these doings, you would be able to find out what part of your computer is causing the trouble. Although, you cannot repair this hardware on your own, you can replace them with the new ones to get your PC going. There could be possibility of a dead or bad motherboard. This increases your concern as you would have to buy a new one.
 Windows 8 (8.1) – Refresh your PC without Affecting Files