Solid State Drives are gradually acquiring attention of those who need to be upgraded. With its aggressive speed capabilities, it is now a way to get rid of low-paced technology. SSD, along with some additional optimization tweaks can even exceed the expectations. Discussed, hereafter are some of those tips to get started with:
For common PC issues, Junk files unclogging, boosting System performance, speeding up Internet and other underlying Windows concerns, we recommend using this tool.
- Step 1 : Download Systimizer ‒ PC Cleaner & Internet Booster (Effective with Windows 10, 8, 7 & XP)
- Step 2 : Click "Scan" to analyze your PC
- Step 3 : Click "Fix" to wipe out all bumps
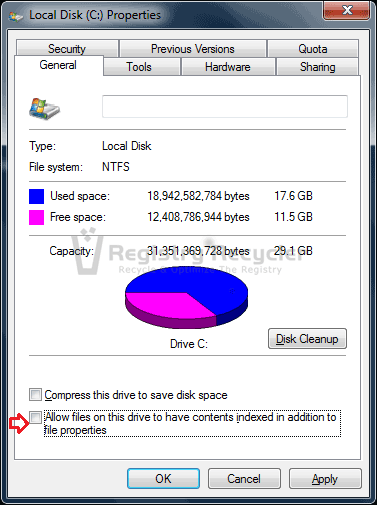
Deactivate Indexing
When it comes to an HDD, indexing verifies to be an appreciated tool. It helps keeping the track of files and makes them available promptly, when searched. This tool optimizes and speeds up the Windows Search. Whereas, this is not the case with SSD as an SSD is self-sufficient in performing this task. Moreover, indexing tends to create and maintain a database and keep on writing files on the drive. This feature of frequently writing data can reduce the life span of an SSD. Therefore, it is required to turn the indexing tool off while integrating an SSD. This deactivation can be done in the following way.
- Open Start menu
- Click on the Computer
- Right-click on your listed Solid State Drive
- Go to its Properties
- Uncheck ‘Allow files on this drive to have contents indexed in addition to file properties’ on the General tab
- Apply and exit
Page File Management
Page file is actually a backup memory, which is used by the system while running out of memory. It is also called Virtual Memory. Operations of a virtual memory are also based on the files written on the drive, which makes it destructive for the SSD drive. It should, therefore, be disabled, moved to HDD drive, or reduced to have a lower impact. This process of disabling, moving, or reducing could be carried in the below stated way.
- Go to Start menu
- Right-click on the Computer and go to its Properties
- Choose Advance system settings on the left-hand side
- Click Settings under the Performance option
- Go to the Advanced tab
- Click on Change, under the Virtual memory
- Uncheck the ‘Automatically manage paging file size for all drives’ checkbox
- To disable page filing: Click No paging file, while selecting each drive under Drive [Volume Label]
- To move page filing to an HDD: Click No paging file for the SSD, and System managed size for the HDD
- To reduce the size of page filing: Click the Custom size, type a starting size, and a maximum size with a marginal value
- Click Set and then OK to exit

Note: After setting the new page file size your system will need a reboot for the changes to take effect.
Write Caching
Write Caching refers to the use of speedy and impulsive memory to collect write commands, sent to data storage devices, and store them temporarily until any storage device can accommodate them. This feature of caching is valuable for an HDD as well as SSD. To enable Write Caching, follow the given steps.
- Go to Start menu
- Right-click on the Computer and go to its Properties
- Choose the Device Manager from the left-hand side
- Open the Disk drives
- Right-click the drive and go to its Properties
- Go to the Policies tab
- Check Enable write caching on the device
- Click OK to exit
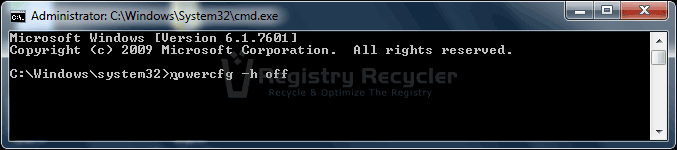
Hibernation
Hibernation is, although an adored tool assimilated in Windows Operating Systems, it might have some negative impact on your SSD. No doubt, this feature helps a lot in optimizing the power issues; however, it is subjected to write the files on the drive. As discussed recurrently, this routine of writing data reduces the life of an SSD drive. Certainly, the impact is minor; still, it is counted while managing even smallest known chunks to improve the performance. To turn off Hibernation, carry out the following measures.
- Go to Start menu
- Type ‘cmd’ in the search bar
- Right-click on the cmd icon
- Choose Run as administrator
- A command prompt window will appear
- Type ‘powercfg -h off’ (without the quotes)
- Press Enter and then exit
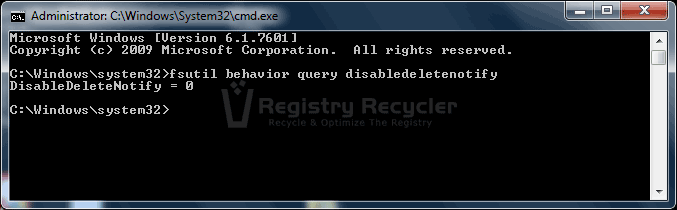
TRIM Support
A TRIM command allows an OS to inform the SSD about the unused blocks of data, in order to wipe them out. Deleted files and removed applications often leave junk files behind them. TRIM Support helps scrubbing this junk to create room for the new data to be written on the SSD. Even though, recent versions of Windows Operating Systems have an activated TRIM support by default, it can still be verified through the following procedure.
- Go to Start Menu
- Type ‘cmd’ in the search box
- Press Ctrl + Shift + Enter to run it in administrator mode
- A command prompt window will appear
- Type ‘fsutil behavior query disabledeletenotify’ (without the quotes)
- Response will be DisableDeleteNotify = 0, or DisableDeleteNotify = 1
- 0 means TRIM is enabled, while 1 signals it isn’t
- In case TRIM is disabled, you can enable it via this command ‘fsutil behavior set disabledeletenotify 0’ (type without quotes)
Defragmentation
Defrag tool supported by Windows eliminates the vacuum and brings the fragmented information closer for a swift execution. This is often useful for the Hard Disk Drives, but may prove lethal for a Solid State Drive. Disabling Disk Defragmentation must be the first thing to do after installing an SSD to your computer. This disabling can be done by;
- Go to Start Menu
- Type ‘dfrgui’ in the Search bar and press Enter
- Highlight your SSD under the Current status
- Click on Configure schedule
- Uncheck the ‘Run on a schedule’ checkbox
- Exit Disk Defragmenter
The explained tweaks would have hopefully, boosted up the performance of your SSD integrated PC to a notable level. It is easy to comply with these tweaks and can be carried out within minutes by anyone.
 Customize Windows 8 to Your Preferences