People are always in pursuit of magical spells to improve the performance of their systems. On a single search, you can get thousands of answers to enhance your PC’s performance. No doubt, these answers may influence your concerns, to some extent. This article refers to the Memory Management features of Servers, as well as, household PCs to a certain extent.
For common PC issues, Junk files unclogging, boosting System performance, speeding up Internet and other underlying Windows concerns, we recommend using this tool.
- Step 1 : Download Systimizer ‒ PC Cleaner & Internet Booster (Effective with Windows 10, 8, 7 & XP)
- Step 2 : Click "Scan" to analyze your PC
- Step 3 : Click "Fix" to wipe out all bumps
The speed of a computer majorly depends upon its memory. As the computer has two basic types of memory, Primary and Secondary, both have unequal role in the promptness of actions. Primary memory, because of being the ready memory, is directly proportional to the speed of your computer. Due to the limited capacity, held by it, Primary memory (RAM) continuously exports data to the Secondary memory (Hard Drive), called Paging. This behavior is adapted, when RAM does not use this data for a specific time span. The overall process of such relocation is called Memory Management. Moreover, many system crashes result due to the disruption in the same Memory. These tweaks are not for novice user, making changes can cause a BSOD/Stop Error.
Your Windows Registry database contains a key related to the management of memory matters, and is accordingly named as Memory Management. There are certain values, enclosed in this key, which can be modified to change the patterns of system’s activities in managing memory. Described below is the procedure to reach this key.
- Point your cursor on the Top-Right corner of your screen to view Charm bar
- Click the Search button on the Charm bar
- Type ‘regedit’ in the search box, and hit Enter to open Registry Editor
- Reply with Yes if prompted
- In the left pane of registry editor, explore Computer node to view registry keys
- Click to expand HKEY_LOCAL_MACHINE
- In the dropped down list, find and click to expand SYSTEM key
- In the disclosed list, locate and expand CurrentControlSet
- Subsequently, locate and inflate Control key
- Discover and penetrate the key named Session Manager
- Finally, select and stay on Memory Management key
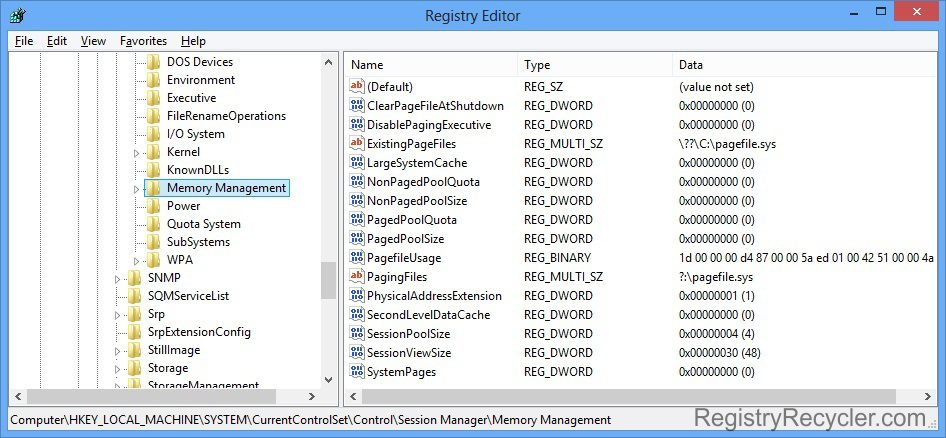
While, Memory Management key being highlighted, you can see some values in the right panel of Registry Editor. Through the subsequent guidelines, you will be enabled to make changes in these values to manage your System Memory with an optimistic approach.
Value 1 ClearPageFileAtShutdown
Page file is the reserved memory on hard drive used as an extension of RAM. This memory contains data that was not recently used by RAM, and transferred to hard disk. It may constitute of the information stored by third party applications. Along with certain personal data, it may include the data like Usernames, Passwords, Credit Card numbers, and other security PINs. Page file can be cleared on shutdown, manually, as Windows does not do so. To clear page file at shutdown:
- Double click this value to Modify
- In the Value data field, change the value from 0 to 1
- Click OK to save your changes
Value 2 DisablePagingExecutive
DisablePagingExecutive permitted systems, load kernel directly to the RAM, rather than Virtual memory, which is comparatively slower. DisablePagingExecutive, when enabled, is also helpful in debugging drivers. A 64-bit Windows may have this feature enabled, by default. 32-bit users can manually enable it by
- Double click this value to Modify
- In the Value data field, change the value from 0 to 1
- Click OK to save your changes
Value 3 LargeSystemCache
An activated LargeSystemCache increases the size of system cache. It usually heightens the system performance, but lessens the physical memory space for other applications and services. This value generally facilitates the servers, whereas, workstations are suggested to shut it down through following steps
- Double click this value to Modify
- In the Value data field, change the value from 1 to 0
- Click OK to save your changes
Value 4 NonPagedPoolSize / PagedPoolSize
Paged pool is a portion of memory that stores the pages with intention to move them to the page file, while non-paged pool is a contrariwise concept that stores the pages but never moves them to page file.
Enabling both the values, require postulating the exact size in bytes. It is suitable to disable these values to put the system in charge of calculating prime value, which adjusts dynamically. The value for Paged Pool size may range between 1MB to 512MB. However, it is recommended to set 192MB.
- Double click this value to Modify
- Change the Base from Hexadecimal to Decimal
- In the filed next to Value data, replace 0 with 192 (making it 192MB)
- Click OK to save your changes
Value 5 NonPagedPoolQuota / PagedPoolQuota
By enabling these values, you are aimed at limiting the memory resources to each single process. If in case, the process tries to exceed the allocated quota, it would fail. Therefore, it is recommended to leave it disabled or disable it (if enabled). Both the values are enabled by specifying the size of memory, allocated to non-paged pool and paged pool, respectively. This size ranges between 1MB and 128MB, and is assigned through Value data. On the other hand, disabling these values authorize the system to calculate an optimal value for both the entries based on current physical memory, and auto-adjusts in case of change in memory size. To disable these values
- Double click this value to Modify
- Make sure the Value data is 0, to make it auto-managed by system
- Click OK to save your changes
Value 6 PhysicalAddressExtension
Physical Address Extension, generally known as PAE, is the technology that enables 32-bit operating system to access more than 4GB memory, up to 64GB or 128GB, depending on the physical address size of processor. A 64-bit system has the ability to access more than 4GB RAM, and does not necessitate PAE. If you have a 32-bit Windows with sufficient RAM, you need to enable this value in the Registry Editor.
- Double click this value to Modify
- In the Value data field, change the value from 0 to 1
- Click OK to save your changes
Value 7 SessionPoolSize
The registry entry noted above deals with the memory used for the allocation of video drivers. If the size of Session Pool is pre-defined, it limits the active session from using excessive memory, and if it does, the session crashes, with a stop message. To avoid such inconvenience you are suggested to elevate the value of SessionPoolSize.
- Double click this value to Modify
- Change the Base, from Hexadecimal to Decimal
- In the Value data field, change the value to 48 (making it 48MB)
- Click OK to save your changes
Value 8 SessionViewSize
SessionViewSize is the key that is related to the desktop heaps within the active session on a server or workstation. It allocates to memory to interactive Window Station. Interactive Window Station contains group of desktop objects like Windows and menus. It has the attitude similar to SessionPoolSize, as it freezes the process, when trying to excess the allocated memory.
- Double click this value to Modify
- Change the Base, from Hexadecimal to Decimal
- In the Value data field, change the value to 96 (making it 96MB)
- Click OK to save your changes
Value 9 SystemPages
SystemPages refer to the number of page table entries (PTE), reserved to store the mapping between virtual addresses and physical addresses. This mapping is performed by dividing RAM into fixed-sized page frames. Information is stored and mapped in these page frames. If value of SystemPages has to be other than 0, it must be allocated with the maximum value, 0xFFFFFFFF. However, it is recommended to leave it system managed, as system adjusts and calculates the optimum value for this entry, if the Value data is left 0.
- Double click this value to Modify
- In the Value data, make sure the text field indicates 0.
- Click OK to save your changes
Value 10 PoolUsageMaximum
This value identifies the allowed maximum usage of paged pool. The value data of this entry signifies the percentage specification of maximum pool usage. This value may not exist in the registry, by default. In such scenario, create a New DWORD Value, and name it exactly as PoolUsageMaximum. Assigning a value data to this key identifies the range to start the Trimming process.
- Double click this newly created value to Modify
- In the Value data field, put ‘60’ to allow 60% usage of total paged pool before trimming starts
- Click OK to save your changes
 Fix Blue Screen of Death (BSOD) in Windows 8 – Part I