How to Fix 0x00000051 Stop Error in Windows 8.1
PC Problems, Windows 8, Windows 8.10x00000051 error, typically called 0x51 or REGISTRY_ERROR, belongs to the vast list of I/O BSODs that force an unexpected system reboot after creating a dire OS glitch. In particular, this fault is caused by an issue in the Window Registry, indicating either a corrupt entry, or a faulty hardware access into the contained sensitive files. Windows Registry is a database of important keys and values that hold vital instructions to load specific programs. It is one of the potent organs of your computer, and needs to be in an impeccable state to ensure smooth PC operations.
For common PC issues, Junk files unclogging, boosting System performance, speeding up Internet and other underlying Windows concerns, we recommend using this tool.
- Step 1 : Download Systimizer ‒ PC Cleaner & Internet Booster (Effective with Windows 10, 8, 7 & XP)
- Step 2 : Click "Scan" to analyze your PC
- Step 3 : Click "Fix" to wipe out all bumps
Unfortunately, as is the case with all other vitals, this constituent is susceptible to various faults leading to dismal consequences. These can include broken entries, incorrect data, misconfigured files, and numerous other concerns adversely affecting the system performance. Eventually, the computer finds no other option but to start again fresh, hoping to bypass the invalid code next time. But, the incident is most likely to repeat itself and the user is left staring at the intimidating blue screen again. Fortunately, there is much more you can do than to wait for the reboot and hope for a better tomorrow. To know how to combat this harmful anguish effectively, read the key methods described in this article, and get well-equipped to quit your suffering. But first, let’s play the investigative game and look at the possible causes presenting you this bizarre illness.
Causes
It is not easy to trace down a dented Registry to some specific reasons. Most likely, the corruption is introduced during computer shutdown, making your task difficult since the process involves various drivers to be loaded/unloaded. This section describes three possible causes of registry_error, and later various troubleshooting steps to repair it.
- Power Failure – In this case, some process may have been modifying part of the registry hive when suddenly it is interrupted by a loss of power. This leaves the registry in an inconsistent state, producing the error upon every I/O procedure
- File Corruption and Faulty Hard Drive – Other files crucial for system operations are incapacitated, or the hard drive consisting of the registry is damaged.
- The Registry is Written to at Shutdown – Sometimes, multiple hives become ruined for no apparent reason. One possible cause to this situation is that the problem occurs at shutdown and is not discovered until windows try to load the registry hive at the next boot.
Solutions:
In this view, we have found following number of methods that can be attempted to fix this stop error:
Method 1: Repair Corrupt Registry Hive
Acknowledging the aforementioned discussion, 0x51 is caused by a corrupt registry hive. A hive is a group of keys, sub keys, and values contained in the registry comprising of a set of supporting files as backups. Every time a user logs on, or alters any of the system settings, these files are constantly consulted and upgraded by the operating system to manage its operations. Unfortunately, this perpetual access can often generate errors, leading to invalid data entries.
Fortunately, there are a few effective troubleshooting steps that one can adopt to work around this issue. This involves backing up existing hives and restoring a previous backup of registry hives. To gain further insight of this procedure, read this post and ensure you are safely guided throughout this task.
This step is most likely to cure your registry error and revive it back to the earlier working state. However, if the illustrated solution does not fit your case, continue with the following methods.
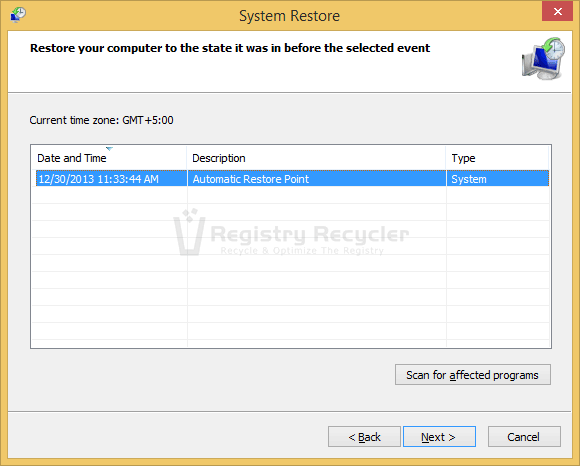
Method 2: Perform a System Restore
System Restore is a Windows feature that undo’s recent system changes and removes potentially harmful alterations made in the sensitive values.
If you can start Windows, here is a step-by-step procedure to execute this task:
- Point your mouse to the top edge of the screen, and drag down to select Search
- Type Control Panel in the search box and click the icon from the results
- Enter Recovery in Control Panel search box, and click the icon
- Choose Open System Restore, and then follow the onboard instructions
If you are unable to launch Windows, perform system restore using these steps:
- Insert Windows 8.1 installation media into the drive
- When prompted, press any key to boot from CD or DVD
Note: if you do not see this message, ensure correct booting order in BIOS
- Choose Repair your computer
- Click Troubleshoot
- Enter Advanced options
- Click System Restore
- Follow the on-screen instructions
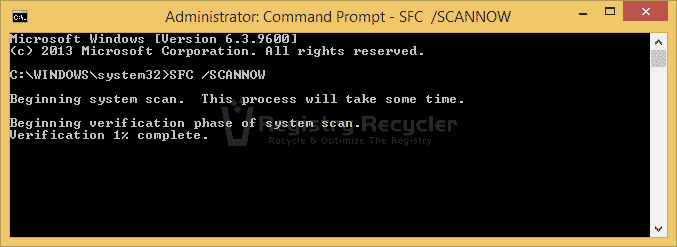
Method 3: Use System File Checker Tool
System File Checker tool is used for repairing corrupt system files crucial to the OS. It works by inspecting all important Windows files, including DLL files, and correcting any invalid information. This is not only important during BSOD troubleshoot, but also a precious maintenance step to ensure smooth PC operations.
If you are able to log into Windows, follow these steps to repair critical Windows files using Sfc with the scannow option:
- Open Start Screen and type command prompt
- Right-click Command Prompt and choose Run as administrator from the bottom menu
- In the elevated window, type Sfc /scannow
- System File Checker will now verify the integrity of every protected operating system files on your computer
- If any file is repaired, restart the system to bring the changes into effect
However, if you are unable to boot into Windows, perform the demonstration below:
- Reach Advanced options using Installation Media Disc as described above
- Click Command Prompt
- Type sfc /scannow in the elevated prompt and hit Enter
- If repaired, restart the system to verify the changes
Solution 4: Check Hard Drive
To check the hard disk for any errors, use chkdsk command and verify that the disk containing the registry is not involved in the problem:
- Open Command Prompt with administrative privileges using any of the methods formerly described
- Type chkdsk /r
- Press Enter
- If prompted, press Y to run check disk upon reboot
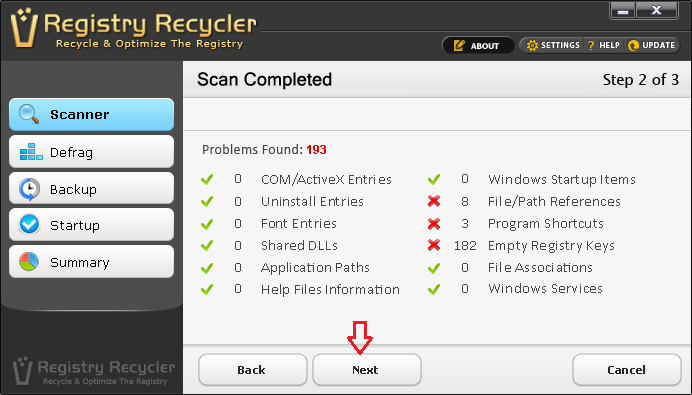
Solution 5: Perform Registry Cleaning
Analyzing and correcting Windows Registry manually requires advanced IT knowledge and essential understanding of the housed complex values. If you are unsure of your skills, it is recommended that you do not disturb the inside content manually, and seek specialized software’s help for this purpose. A good registry tool will fix or remove all bad entries and ensure healthy registry records. To protect and relieve your Windows registry against errors, use Registry Recycler. Not only will this exceptional element repair your registry errors, but it will also mend all orphaned records corrupting other system processes. However, you can only perform this task if you are able to boot into to Windows.
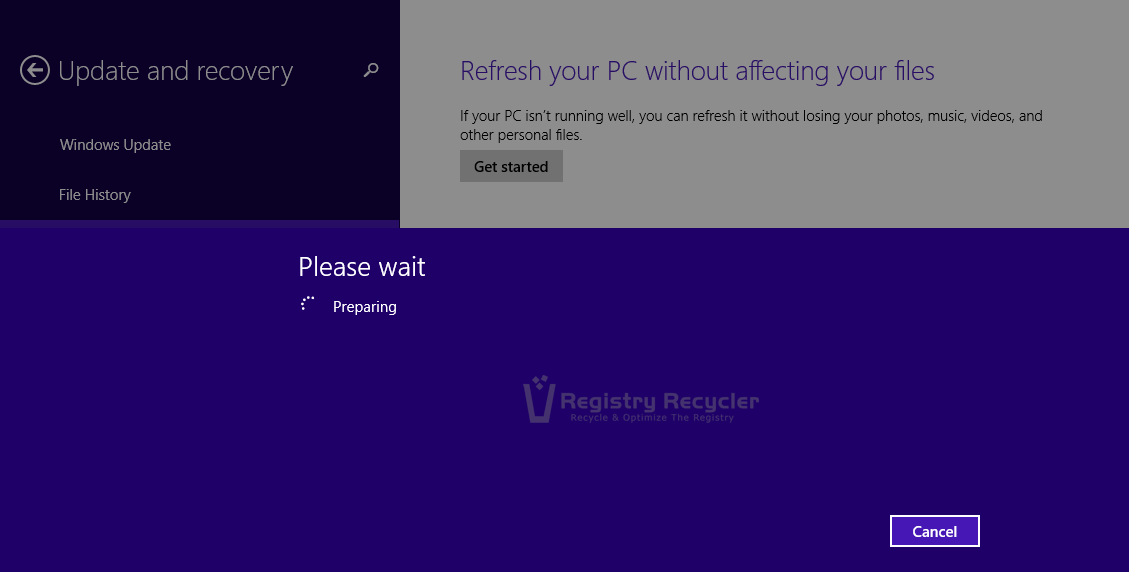
Solution 6: Refresh Your PC
If performing these methods did not bring you the desired results, you may perform a System Refresh to start with a clean slate. This tool reinstalls Windows, but keeps your personal settings and Metro apps intact. Any possible issues with the Windows files or registry values are wiped out, erasing the error completely.
If you can boot to your computer, follow this step-by-by procedure:
- Hover to the top edge of your screen and bring your cursor down to select Settings
- Click Change PC settings shown below
- Click Update and recovery
- Choose Recovery
- Under Refresh your PC without affecting your files, click Get started
- Execute the onscreen instructions from here onwards
If you are deprived of safe booting process, choose the appropriate option from Troubleshoot screen:
- Insert Windows 8.1 installation media into the drive
- Start the system and press any key to boot from CD or DVD
- Click Repair your computer listed under Install now
- From Choose and option screen, click Troubleshoot
- Select Refresh your PC and follow described instructions
 Hard Drive Optimization Tips and Tricks