Fix Windows Search Service Failed to Start In Windows 10/8/7
PC Problems, Windows 10, Windows 7, Windows 8, Windows 8.1Windows Search Service is a potent tool incorporated into the Search application to help organize the extracted features of a collection of documents, and simply deliver search results in a more presentable way. When processing files, this service, known as WSS, works by analyzing a set of documents, extracting useful information, and finally organizing the pulled data to return document’s properties in response to generated queries.
For common PC issues, Junk files unclogging, boosting System performance, speeding up Internet and other underlying Windows concerns, we recommend using this tool.
- Step 1 : Download Systimizer ‒ PC Cleaner & Internet Booster (Effective with Windows 10, 8, 7 & XP)
- Step 2 : Click "Scan" to analyze your PC
- Step 3 : Click "Fix" to wipe out all bumps
While it all sounds efficient and slick at the moment, unfortunately, this facility is as prone to errors as any other process. One dilemma that is increasingly troubling Windows 10, 8(8.1) and 7 users is the observation of a failed WSS start. Specifically, the message is as followed:
“Windows could not start the Windows Search service on Local Computer.
Error 2: The system could not find the file specified”
If your WSS is stuck in a similar quandary, refer to the troubleshooting methods illustrated below and cure the service instantly.
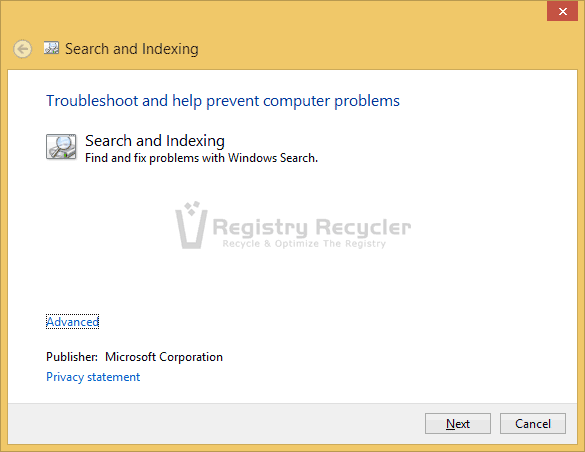
Method 1: Use Windows in-built Windows Search Troubleshooter
Luckily Windows provides an inbuilt Mr. Fixit to find issues with the Search tool and fix them automatically. This can be accessed by following these steps:
- Open Start menu/screen
- Type Windows Search
- Select Find and fix problems with Windows Search
- Follow the instructions to resolve your specific circumstance
Sometimes, the troubleshooter fails to report/heal errors related to Search and Indexing. If this is your case, proceed to the other solutions.
Method 2: Redo Registry Changes (Only Windows 10 and Windows 8(8.1))
WSS error is mostly traced to an undesirable alteration, either manually or by a third-party software, made in the Windows Registry. Typically, these include clearing out vital folder path references, leading to the missing file issue. The easiest work around to this problem is to manually edit the Registry, rename the key mentioned below and let the system recreate a new one:
- Launch the Run box (Windows + R keys)
- Type regedit and press Enter
- In the Registry Editor window expand HKEY_LOCAL_MACHINE from the left pane
- Click the arrow next to SOFTWARE
- Expand Microsoft
- Expand Windows Search
- Scroll down to reach FileChangeClientConfigs and right-click it
- Rename it to FileChangeClientConfigs.Bkp
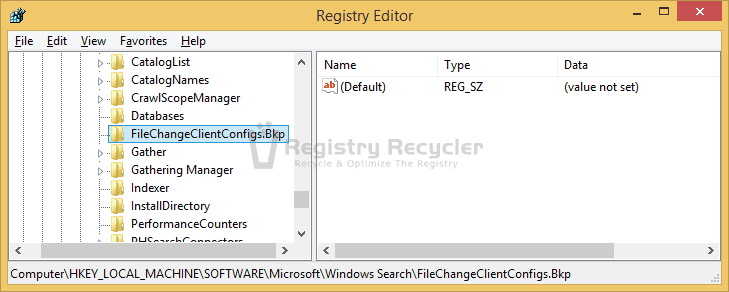
- Exit Registry Editor and restart your system
- Go to services.msc from your Run box (Windows + R keys)
- Locate Windows Search and right-click it
- Start this service to verify the solution
Upon failing to find FileChangeClientConfigs, Windows will automatically create a new entry in the registry. See if the indexing now works. Otherwise, proceed with the troubleshooting.
Method 3: Run System File Checker
As can be inferred from the error statement, WSS is failing due to a missing system file. To search and repair this crucial item, use the SFC tool from an elevated command prompt, shown below:
- Press Windows + X keys to open system menu (Windows 10 & 8)
- Choose Command Prompt (Admin)
- Windows 7 users can type cmd in Start menu
- Right click cmd (Command Prompt) and choose Run as administrator from the menu
- In the elevated black window, type the following command and hit Enter
- sfc /scannow
- Wait till the scan is complete (typically 1-2 hours, newer PC will execute quickly)
- Reboot the system to fix issues, if found
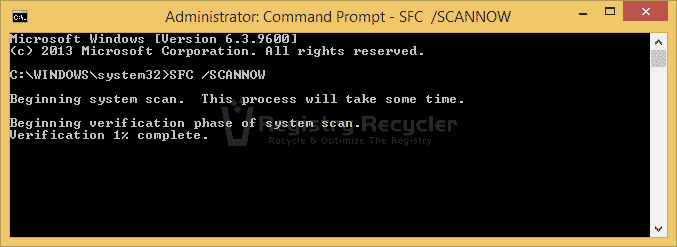
Redo the problematic activities and notice if the trouble is relieved. If not, continue to the final solution.
Method 4: Rebuild Search Index
Rebuilding the search index loads the setup from start and removes any potential issues upsetting the utility. To manually perform this task, here are the steps:
- Open Registry Editor
- Reach Widows Search key as demonstrated previously, and highlight it
- Double-click SetupCompletedSuccessfully value located in the right pane
- Change its Value data from 1 to 0
- Click OK
- Restart your system
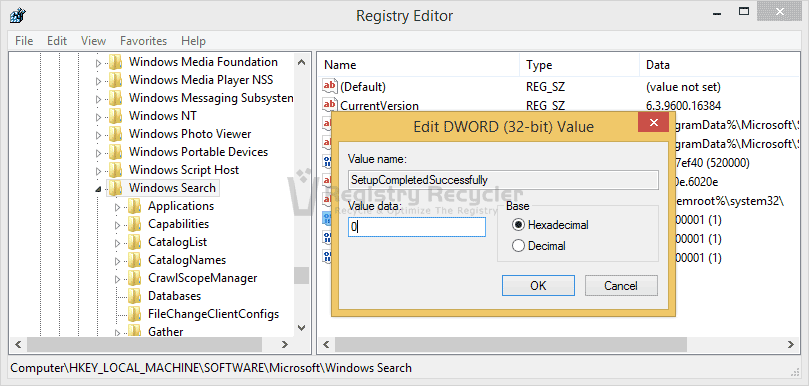
Note: If SetupCompletedSuccessfully does not exist, right click the right pane; select New then DWORD (32 bit) Value.
Try starting the service again. Your trouble would most likely be relieved by this procedure.
If still having the issue after all the resolves are practiced then clean your registry as a final rejoinder. Using fraud registry cleaners to handle sensitive entries is a punishment your system does not deserve. Instead, it is suggested to operate only the proven and the most highly acclaimed utilities to perform this decisive task. One preeminent entity that fulfills all crucial criteria is Registry Recycler, which is an outstanding free registry cleaner for Windows 10/8.1/8/7.
 Fix Defrag error 0x80070057 in Windows 8.1