One of the main purposes of PC usage largely depends on gaming. According to the analysts, more than 60 percent of Gamers in America game on PC. This stat is quite noteworthy, as modern gaming consoles with Kinect and motion detection features are still sectional. Dozens of new games releasing every year require elevated system resources for an uninterrupted gaming experience. Despite of having it all, many gamers still grumble against the issues, which hinder a smooth game-play.
For common PC issues, Junk files unclogging, boosting System performance, speeding up Internet and other underlying Windows concerns, we recommend using this tool.
- Step 1 : Download Systimizer ‒ PC Cleaner & Internet Booster (Effective with Windows 10, 8, 7 & XP)
- Step 2 : Click "Scan" to analyze your PC
- Step 3 : Click "Fix" to wipe out all bumps
This article explicitly addresses the gamers and provides them with tips and tricks to improve their systems’ performance while playing. Please refer to the sections below and learn on how to progress in terms of PC gaming.
Close all other Processes, Services, and applications
If you are playing, you are definitely not doing anything else. All the active process, services and applications running in the background, either visible or not, are consuming your memory and other system resources to some extent. It is obvious that a game application requires adequate MBs of free memory to perform simultaneous actions easily. To provide this free memory, it is submitted to close down each running application (except the game) to free up the memory. Closing applications is a simple process, as these are easily visible in your taskbar or notifications area. However, this is not the case with all other processes and services. To shut down unnecessary among them, follow the instructions given below.
- Right click the Taskbar and choose to Start Task Manager
- Go to the Processes tab and identify the unnecessary processes
- Click the button stating Show processes from all users
- Login as administrator on UAC message to view more processes
- Select these processes and click End Process button
- Now access the Services tab to identify unnecessary services
- Click right on these and services and choose to Stop Service
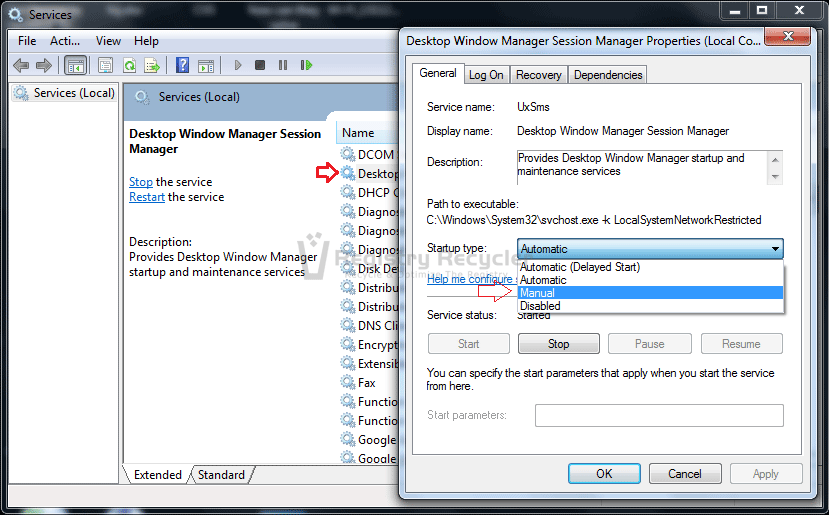
You can look for some of the services that are safe to be turned off. As far as processes are concerned, you would have to find them out on your own self. You can also identify unnecessary processes through unnecessary services. Right click such services and choose Go to process.
Overclock your Hardware
In order to get merely high performance out of same old computer, it is usually suggested to alter the clock frequency of contained CPU, GPU, and RAM. If tweaked to overclock, these hardware components will run faster than usual, providing improved gaming experience and quick graphic transitions. To start with, you need to update your BIOS and install the overclocking utility, supported by your motherboard. You will easily find detailed methods to have this done.
Please note that overclocking may heat up your PC components and need supplementary fans to sustain their temperature. Moreover, setting the clock frequency higher than the capacity may damage the hardware of your computer.
Defragment your Disk
Hard Disk Drives continuously absorb new data. Frequent addition of new information and deletion of the old one causes the data to form clutters. It is then hard for system to track down the scattered game files, resulting in lags and pauses. To rearrange these fragmented files and data, Windows 7 offers a built-in tool named as Disk Defragmenter. This tool analyzes the drive to detect the ratio of fragmented information and then perform a defragmentation process. This eliminates the empty sectors between the occupied ones to bring the fragments closer, positioning it in an unbroken thread. As a result, the game files are easily pursued for a smooth flow. To make use of this tool,
- Press Windows key on your keyboard and type disk defragmenter in Start search
- Hit Enter key to open Disk Defragmenter window
- Select each drive and click Analyze disk button to detect fragmented information therein
- If required, click Defragment disk button to start defragmentation
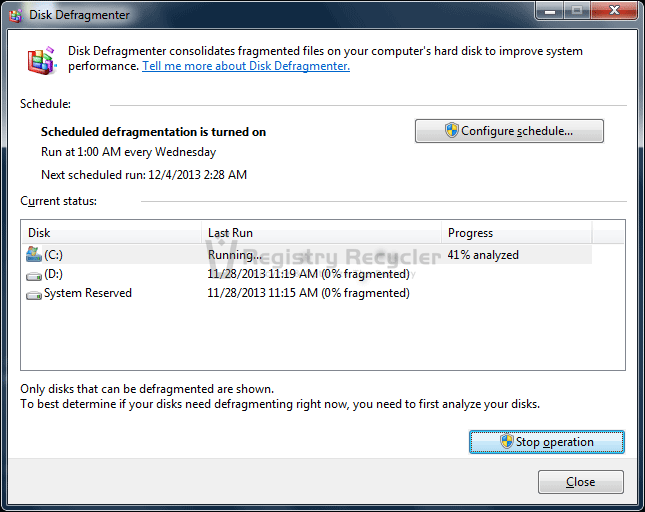
You can also direct this tool to carry out automatic checks at intervals to conduct the defragmentation process. Please not that if you are having SSD drive in your machine, it does not need to be defragmented, as it does not engage any fragments of information.
Clean Windows Registry
Windows Registry is a set of information that contains specific instructions for applications, drivers, and services. System refers to the relevant information in registry, whenever an activity is performed. Such continuous use of registry makes it corrupted by assimilating errors. To attain an enhanced experience of gaming, you need to fix registry errors using a reliable registry cleaning software.

Upgrade Graphics Hardware
The easiest way to improve the system performance in concern of gaming is to upgrade the graphic device. Modern Graphic Processing Units have their own memory to assist the simultaneousness. This adds a smoothening effect to the instances within game. It is nowadays easy to extract out the existing graphic card and inserting a new one.
Update Drivers: Either you have adapted a new graphic hardware or still using an old one, the performance is surely affected by their concerned drivers installed. Check out the latest updates for your Graphic card driver on regular basis. Just log on to the manufacturer’s website and search through the updates category.
Increase Virtual Memory
Virtual Memory is empty space on hard drive that is substituted and act as ready memory, by the system. It is a mechanism, where the unused files of running applications and processes are relocated to the hard drive. This moved data still remains active, and is retrieved by the RAM whenever the user tries to access it. This memory can be increased to assimilate a larger size of data making more room for the memory to facilitate the running game. To increase the virtual memory,
- Go to Control Panel, view it in icons, and access System icon
- In the right side of System window, click Advanced system settings
- Go to the Advanced tab and click Settings under Performance section
- In the Performance Options window, go to the Advanced tab click Change button
- Click to choose the Custom size for virtual memory
- Put Initial size and Maximum size in MBs, and click OK button to save changes
- Click OK on Performance Options window and then System Properties window
It is directed to restart your computer in order to take effect of the changes you have made. Subsequent to this procedure, you can enjoy an adventurous gaming experience with larger dedicated memory.
 Is Your Internet Connection Fast Enough?