Although there are later versions available, Windows 7 however has the largest market share of all. This version of Windows was a major triumph of Microsoft Corporation, and still fetching a great amount of revenues. No matter how efficient and adored an operating system might be, it usually in-takes certain issues that affect its performance.
For common PC issues, Junk files unclogging, boosting System performance, speeding up Internet and other underlying Windows concerns, we recommend using this tool.
- Step 1 : Download Systimizer ‒ PC Cleaner & Internet Booster (Effective with Windows 10, 8, 7 & XP)
- Step 2 : Click "Scan" to analyze your PC
- Step 3 : Click "Fix" to wipe out all bumps
Like other versions of similar chain, Windows 7 is possible to induct errors over the time, slowing down its operations. These errors can duly be addressed and resolved with the help of simple tweaks, without making extra payments. This article stresses on same kind of tips, to be performed by the users solitarily.
Please refer to the instructions given below for making required adjustments and reducing the response time for your commands.
Minimize Startup
Startup is the first phase of a system, when users are logged in. This phase consists of programs and applications that launch automatically each time the system boots. Each item listed in the startup surely consumes some of the resources while becoming active. You are hereby advised to see through your startup list and identify the programs that are not of your immediate use. Preventing such programs to go onboard will positively impact the system startup time. In this connection, you can carry the following steps.
- Press Windows key on your keyboard to open Start menu and type msconfig in the Start search
- Hit Enter key to open System Configuration dialog box and go to its Startup tab
- In the list of items, uncheck those unnecessarily listed
- Click OK button to apply the changes
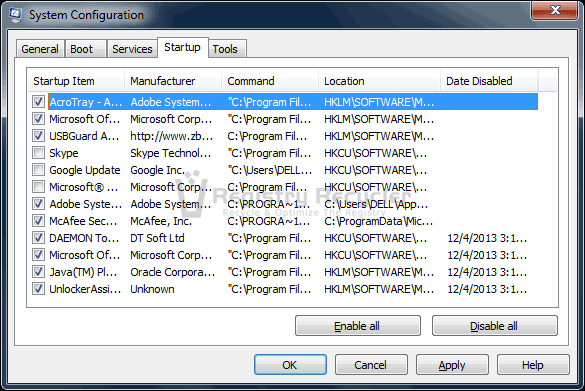
You can also use Registry Recycler’s Startup Management Feature for free to disable or remove Startup items.
Minimize Services
Almost every activity on your computer is supported by a service on the back end. These services are either of Windows or third party applications. Many services tend to launch their selves, whether they are wanted or not. The same mechanism, described for Startup items, apply to the services. To add up the memory available for desired operations, all you have to do is just stop the unrequired services to takeoff spontaneously. For this purpose,
- Right click on the Taskbar and choose to Start Task Manager
- In the Task Manager window, go to Services tab and sort the services by their Status
- Review the running services and identify those not of your current use
- Right click such services and choose Stop Service
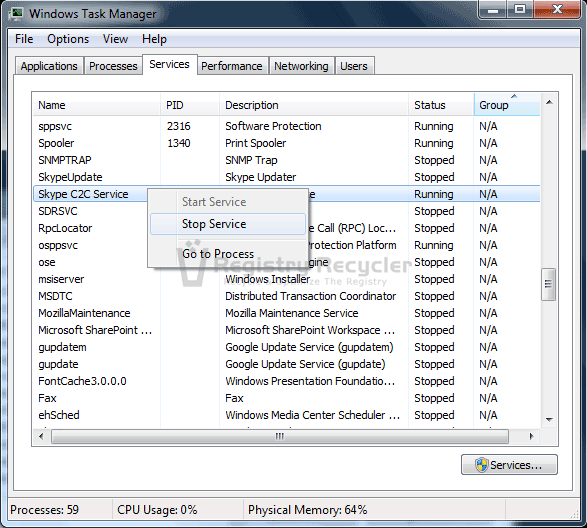
To have knowledge, what each of these services is capable of, you can click on the Services button below on this dialog box. Highlight each service to read its description. A permanent induction behavior of a service can be modified through its Startup type in its Properties. Go through this link to know what services you can disable in Windows 7.
Manage an SSD
SSDs are taking edge over the conventional hard drives, due to their capacity of high readable speed. However, this modern storage device is much more subtle than a shrewd hard drive. That is why, extra caution is needed while maintaining a SSD. Prefetch, Superfetch, and Disk Defragmentation are the utilities that may influence adversely on Solid State Drives, reducing their lifespan. It is better to turn off such operations for a sustainable performance. Here in this post, you can find out ways to obstruct these features.
Make Use of ReadyBoost
Windows 7 offers a much-simplified method to ReadyBoost your system’s performance through an external storage device. Such devices like USB flash drives can be simulated to perform as the ready memory (RAM) for your computer. As a result, the system is able to easily carry more operations at a time, or run existing operations more quickly. Although the minimum capacity of a USB Storage device required to ReadyBoost is 256 Megabytes (MB), it is however recommended for this acceleration to use capacity one to three times that of RAM. For example, 3GB ReadyBoost against 1GB RAM. To make this functional,
- Make sure the USB storage device is connected to your computer
- In Computer window, right click USB Drive to access its Properties
- Go to ReadyBoost tab and choose between the last two options
- Dedicate this device to ReadyBoost should be selected if the external memory has nothing on it
- Use this device should be selected if you want a particular amount of memory to be used
Please be informed that the reserved space should be the same in MBs, as detailed below on the same dialog box. It should also be noted that ReadyBoost feature may not run of systems with SSD.
Remove Bundled Applications
Bundled applications are those already installed on a new machine having Windows operating system, by the manufacturer. The purpose is to add accessibility for the users. However, not all users may connect to these applications. Check if your computer also has the fitted programs that were never used by you, and remove them to liberate the resources. In this regard,
- Go to Control Panel and click Uninstall a program under the Programs category
- In the list of applications, locate the unwanted programs and right click them to Uninstall
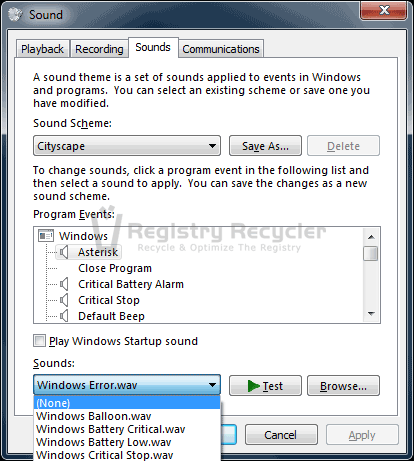
Disable Unnecessary Sounds
Each of the Windows features, no matter how minimal it is, consumes a specified amount of memory and other system resources. If these features do not fascinate you, turn them off to save the possessions for other activities. Windows Sounds are among these tiny features. If you have already made up your mind to prefer the performance to sounds, comply with the following guidelines.
- Go to Control Panel, click Hardware and Sound category, and then Sound as a subcategory
- In the newly appeared dialog box, go to the Sounds tab
- Highlight each of the Program Events and select (None) in the dropdown menu under Sounds
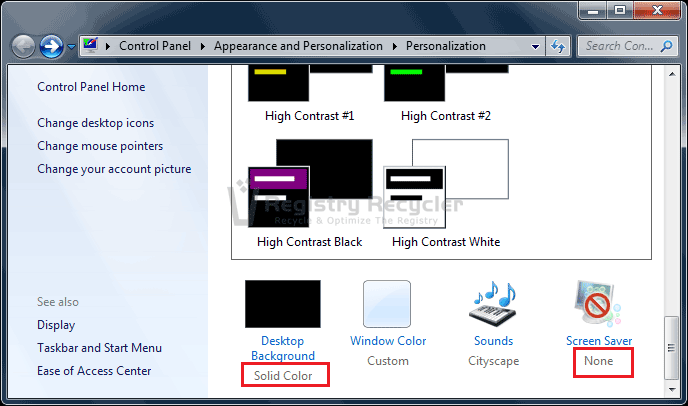
Disable Screen Saver and Wallpaper
Undoubtedly, Windows 7 has much stunning visuals. However, these visuals are displayed at a cost of your system’s memory. If you cannot tolerate that, just disable these visuals like Wallpaper and Screen Saver to keep things faster. To do so,
- Right click on your Desktop screen and choose Personalize
- On Personalization screen, click Desktop Background and choose Picture location as Solid Color
- Now click Screen Saver and set it to (None)
- Save the changes and Exit
Once, you have amalgamated all the changes suggested in this article, you would definitely notice a not-the-same system performance that used to be. There are many other ways directing your PC towards a never-dropping and long-lasting performance. In connection to this, you can explore this site for other useful recommendations.
 6 Common Problems of PC Random Restarts