System maintenance tools have always been playing a key role in sustaining your PC’s optimum performance. Applications like antivirus and security solutions, cache cleaners, download boosters, registry cleaners, battery optimizers and others are helping users manage their computers. This article emphasizes one of listed utilities that specialize in managing Windows Registry.
For common PC issues, Junk files unclogging, boosting System performance, speeding up Internet and other underlying Windows concerns, we recommend using this tool.
- Step 1 : Download Systimizer ‒ PC Cleaner & Internet Booster (Effective with Windows 10, 8, 7 & XP)
- Step 2 : Click "Scan" to analyze your PC
- Step 3 : Click "Fix" to wipe out all bumps
- What is Windows Registry?
- Why Clean Registry Errors?
- What is Registry Recycler?
- How to Use Registry Recycler?
What is Windows Registry?
Microsoft Windows require certain data and instructions to perform operations, preserve settings, and work with applications. These sets of instructions are kept in an obscured database called registry. The changes made in visible settings and options of Windows itself and applications respectively, actually affect and modify their concerned registry keys and values. In simple words, Windows Registry controls and regulates the behaviors of Windows components and applications. It stores information required to configure the system one or more users, programs and hardware. Configuration files scattered throughout your system drive are unified in this single interface. Windows Registry is frequently referred during a login session, where the system reads, writes, and erases information on continual basis.
What are Registry Errors and why do we need to remove these?
As stated earlier, system repeatedly modifies the registry by creating new entries and removing some of the old ones. Which means registry is all the way active, since a user is logged in. Certain detrimental events can interrupt the registry while it is operating. In such a situation, registry is most likely to seed errors within itself. These errors can surely cause disruption in a system’s performance. Apart from that, when an existing application is uninstalled or removed from the system, certain registry information of these applications is left behind. Such information mounts up generating a number of unused and unwanted registry entries. When the system consults registry to carry out a certain operation, it is hindered by the contained errors. In the result, it may take long to complete the operation, freeze the session, denies performing the assigned activity by crashing down, and/or proceed with lags. No doubt, these issues are quite annoying for a user. In such a scenario, it is proposed to clean your registry by eliminating these errors. However, this might be impossible to do it manually, even for an expert user.
What is Registry Recycler?
Registry Recycler is a registry cleaning software that simplifies a complex task of examining registry information, spotting out the errors/invalid keys, and conducting a cleaning operation. Registry Recycler aims to liberate your registry database from the elements that adversely affect the performance of your computer. It is free of cost and easy to use. Its low size takes a short while to download and install.
Registry Recycler is a multifunctional application, which deals to cure the Windows Registry and optimize the system performance at the same time. It comes with several value-added features like multi-dimensional registry scan, registry defragmentation, automatic backup creation, startup management, and scheduled maintenance checks. Being precise, this small utility has a lot to offer with no knock-on effects. In the proceeding section of this article, you will find basic and systematic guidelines on how to make use of it.
How to Use Registry Recycler?
Although the use of Registry Recycler is simple enough and intelligible for even a novice user, we still intend to comprehend the steps involved in operating it. Once you have downloaded and installed Registry Recycler, refer to the following easy steps categorized under each relevant feature.
- Launch Registry Recycler software
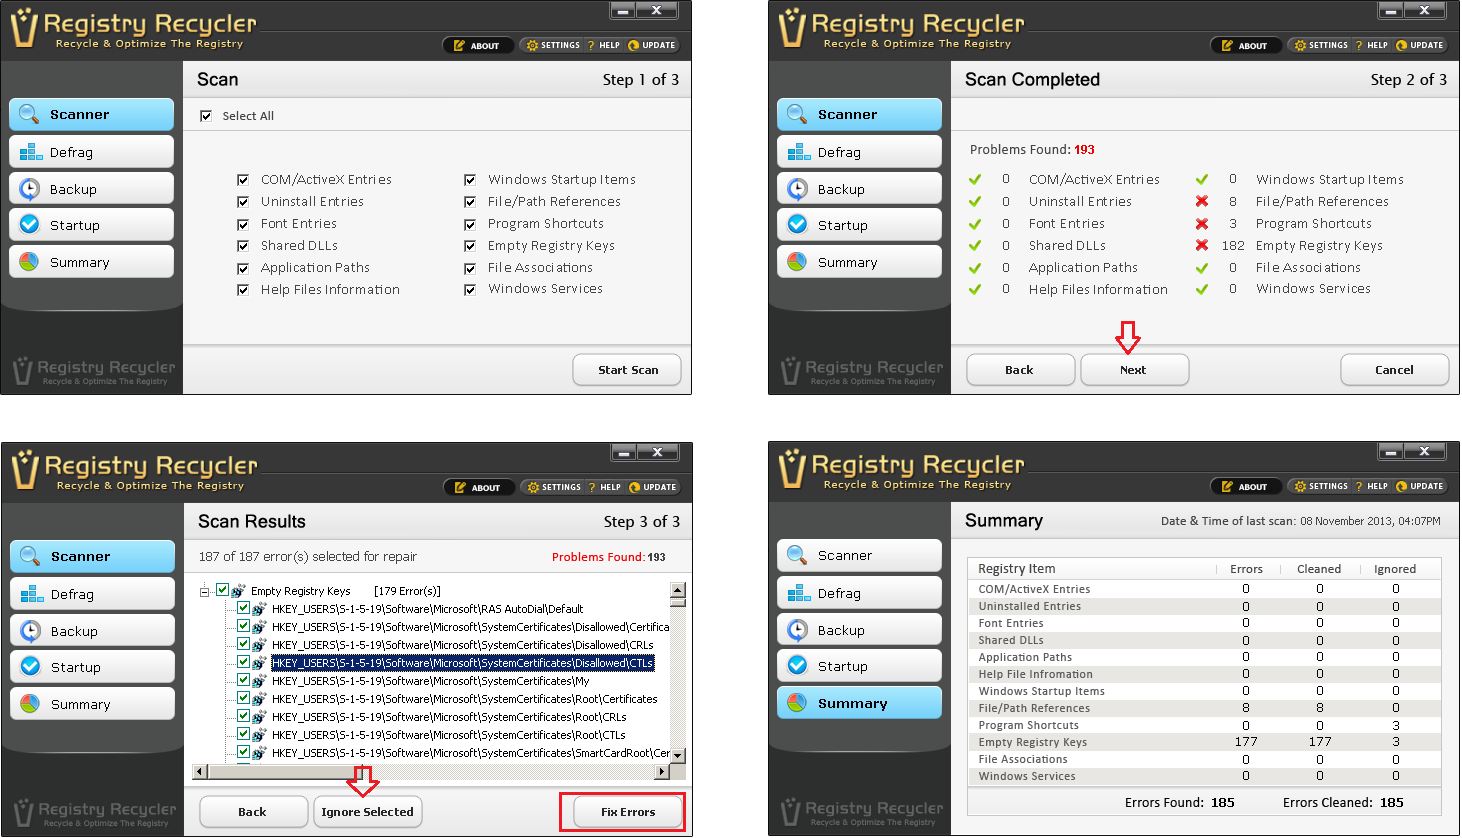
Scanning Registry for Errors
- The first screen displayed is the Scanner tab
- The Scanner tab allows you to scan through twelve different locations within registry
- You can include and exclude these destinations from the scan just by checking and unchecking the boxes next to these. However, it is recommended to go with all of these selected. Be informed that each scan creates an automatic backup of current registry, specified with the date and time it is created.
- Click on the Start Scan button at the bottom right corner to initiate the process
- While the registry is being scanned, the problems found are displayed in red
- Click Next button when the scan finishes
- On the next screen titled as Scan Results, you will be presented with the errors found with their locations, under the listed categories. If you are a registry-literate, you can uncheck the entries that you do not want to remove. Such entries can also be put into Ignore List by highlighting the item and clicking on Ignore Selected button.
- In the other case, click Fix Errors button to wipe out the corrupted and invalid entries. The errors are then eliminated followed by a Summary view of detected, cleaned, and ignored errors.
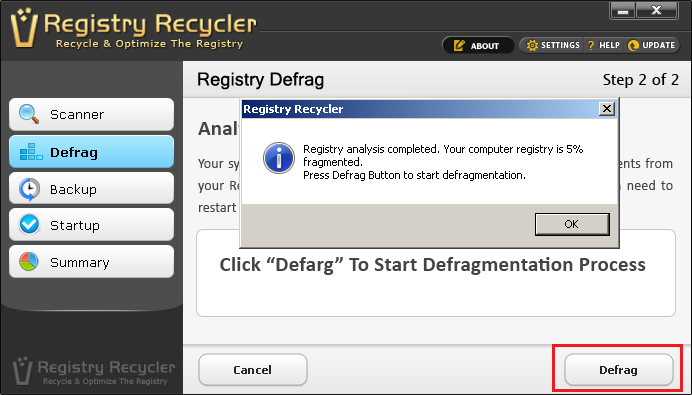
Defragmenting Registry
- Click Defrag button in the left side bar
- Click the Analyze button in the bottom right corner, so the software examines your registry for possible fragments.
- It will tell you whether the registry needs to be fragmented or not
- If yes, click the Defrag button to proceed
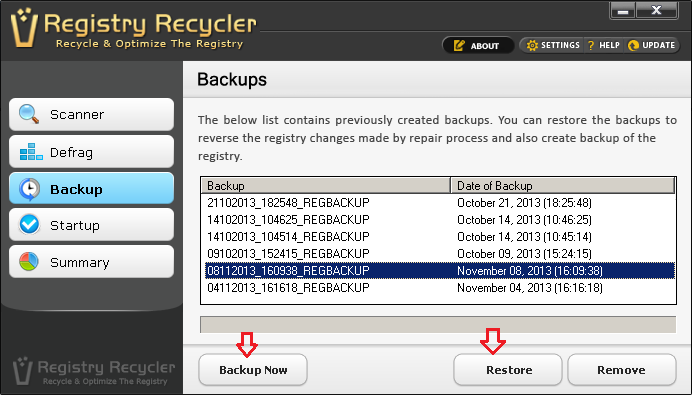
Backup & Restore
- Go to the Backup tab
- Automatic backups created during the fixing process are listed in this tab
- You can identify a previous registry setting through the Date of Backup
- You can Restore or Remove the backup from this list
- On the same screen, you will find a Backup Now button. Click this button to create a manual backup of entire registry
Startup Management
- Go to the Startup tab
- This tab displays the list of processes and applications intended to launch when system starts
- Click Enable All button to allow each of these processes to initiate on startup
- Click Disable All button to prevent all these applications to initiate on startup
- Click any Enabled item from the list followed by Disable Selected button to stop it from initiating when the system starts
- Click any Disabled item from the list followed by Enable Selected button to allow it to initiate when the system starts
- Click any item from the list followed by the Remove Selected button to completely remove it from the Startup category

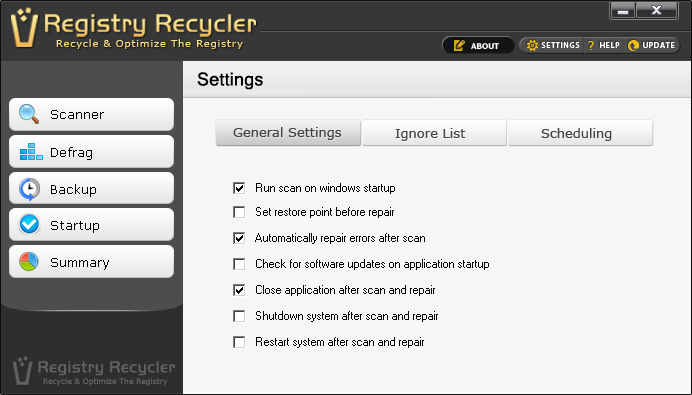
General Settings
- Click Settings button near the top right corner
- On the Settings screen, stay on General Settings tab
- Check the option Run scan on windows startup if you want Registry Recycler to launch and start the scan when system boots
- Check the option Set restore point before repair if you want Registry Recycler to automatically create an image of existing system settings
- Check Automatically repair errors after scan if you do not want to be asked each time to fix errors
- Choose the option to Check for software updates on application startup to be aware of new versions
- Check Close application after scan and repair if you want the Registry Recycler to close itself when the scan and repair finishes
- In the last two options, you can choose between Shutdown or Restart system after scan and repair. This will either turn off the system on process completion or reboot it, respectively.
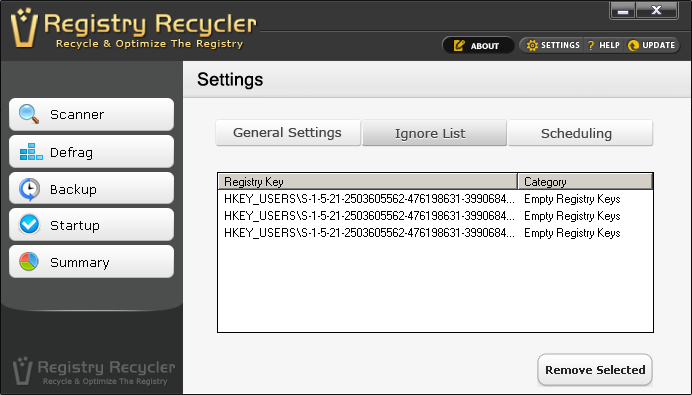
Ignore List
- Go to the Ignore List tab on Settings screen
- This tab contains the list of registry keys you selected to be ignored in the scanning process
- These registry keys bypass the scanning process every time
- To remove these keys from list, select each of these and click the Remove Selected button
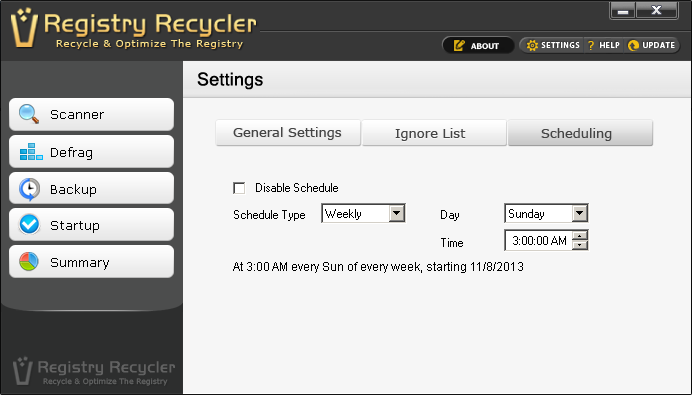
Scheduled Scan
- Click Settings button
- On the Settings screen, go to the Scheduling tab
- Uncheck the option Disable Schedule
- Choose the Schedule Type for Daily or Weekly automatic scan
- If you choose Weekly, choose a Day of week to carry the automatic scan
- Set the Time of scan to initiate the scan process automatically
Update
The Update button appears near the top right corner of application interface. Click this button to search for and download the latest version of application. The update is all free and takes less than a minute to download and install.
Register
Although the Registry Recycler is free to download and use, the developers assume to be remunerated for the effort they have made. Click the Register button to get a license code against your email address. This will help the originators to enhance their product and supporting services.
Although the said software is easily accessible and user-friendly, the above instruction would let you have a firm grip of intended operations.
 How to Fix RunDLL Errors in Windows Startup