It has not been a long time, since you have installed Windows 8.1 on your computer. As you are still in the phase of testing and experiencing, we can help you out in making things simpler. Although, Windows 8.1 does not look very different from Windows 8 except little vagaries, you will find a lot more variations while exploring through it.
For common PC issues, Junk files unclogging, boosting System performance, speeding up Internet and other underlying Windows concerns, we recommend using this tool.
- Step 1 : Download Systimizer ‒ PC Cleaner & Internet Booster (Effective with Windows 10, 8, 7 & XP)
- Step 2 : Click "Scan" to analyze your PC
- Step 3 : Click "Fix" to wipe out all bumps
As a beginner of this new version, be advised to perform the following measures in attaining maximum performance.
Clean Old and Temporary Files
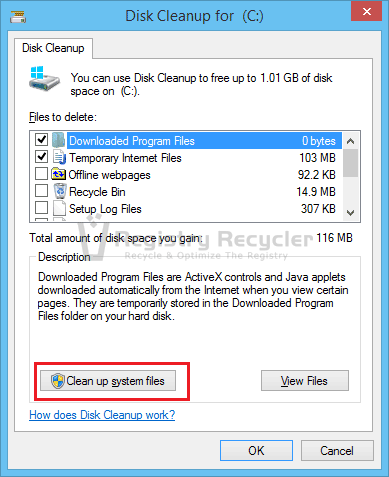
As you have just been transferred from one platform to the other one, there were obviously some momentary files created. These files are referred for restoring the previous session in case of failure in upgrading. Now, as you are surfing 8.1 and enjoying our article on it successfully, there is no need to retain such unwieldy data. You can delete these unwanted files and free up a significant amount of space in your hard drives. For this purpose,
- Search and open Disk Cleanup utility from Start screen
- Select your System Drive and in the subsequent window, click Clean up system files button
- Click to permit the option Previous Windows installation(s) and click OK
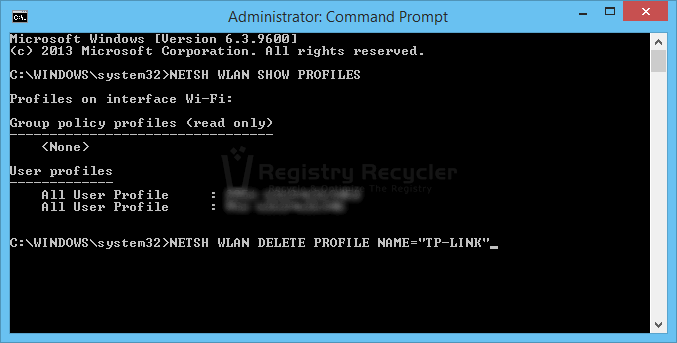
Clear out Wireless Network View
Just like Windows 8 and other previous versions, Windows 8.1 also pollutes your WLAN networks screen with many unused entries. These stated networks were either connected days ago through this system, or just are available and within the rage of your Wi-Fi. If you are not fond of such dense environment and want not to populate the available wireless networks screen, perform the steps below.
- Right click Windows 8.1 Start button to bring up the Power User menu
- In the list of items, click Command Prompt (Admin) and click Yes on UAC message
- Type command line NETSH WLAN SHOW PROFILES and hit Enter to view listed WLAN profiles
- Now type NETSH WLAN DELETE PROFILE NAME=”PROFILE NAME” and hit Enter to delete each
- PROFILE NAME in the above command should be replaced with the network name to be removed
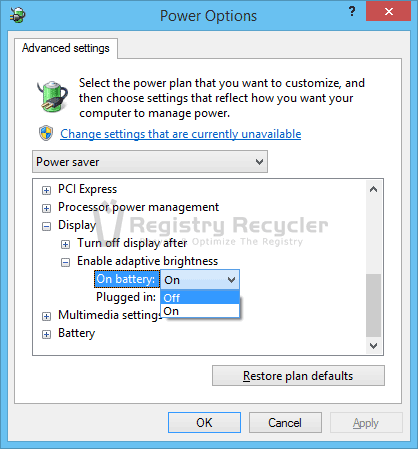
Disable Automatic Brightness
Setting brightness to change automatically in response to the surrounding light, Windows 8.1 prefers you to let its concerned feature be enabled. However, some users consider it as a babyish treatment and do not want the system to handle everything on its own. You can tweak the settings to leave the brightness high, low, or medium and not manipulate. Change the Power options in the following manner.
- Press Windows key + S on your keyboard to start a new Search
- Type Power Options, hit Enter to open and click the words stating Change plan settings
- Now click Change advanced power settings at the bottom
- Expand the Display category and turn off the feature Enable adaptive brightness
- Click OK to save your changes
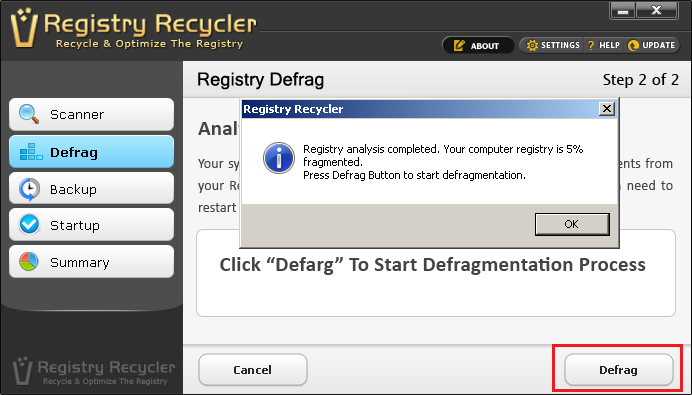
Defragment & Repair Windows 8.1 Registry
As it is obvious, Windows 8.1 is not a fresh install but just an upgrade of settings and components. During this update process, the system must have carried writing new information and removal of the old, on both disk and Windows registry. It could therefore be helpful to defragment and clean Windows 8.1 registry against errors using free Registry Recycler to attain smooth performance. As it is highly complex process and may not be possible to perform manually, you should have a reliable registry cleaning software.
- Open Registry Recycler
- Scan your Registry with the software to detect and display errors
- Remove the errors to ensure a clean registry database
- Analyze the registry to view if the contained information exists in fragments
- If it does, command the software to defragment registry and create a constant thread of entries
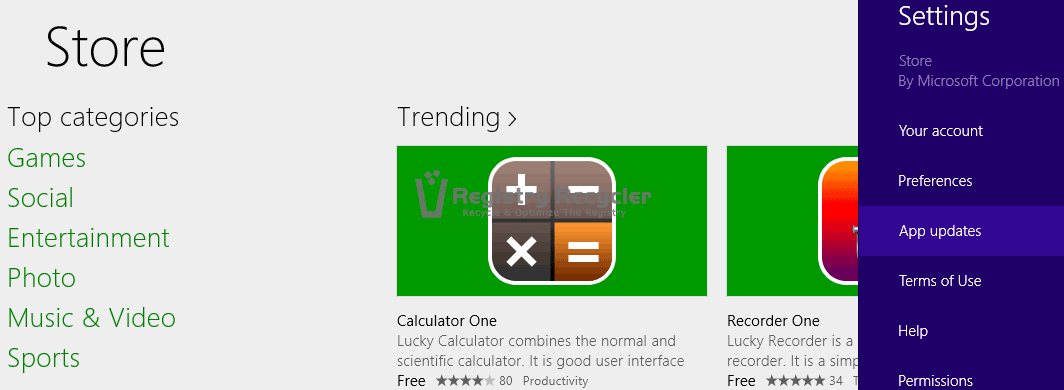
Disable Automatic Apps Update
Windows 8.1 really seems autonomous, while performing certain actions on its own, without the consent of its user. Another example of this indomitability is updating the programs automatically, out of your knowledge. At times, it is quite infuriating as it eats up your internet speed and makes sure everything is up to date, whether you want it or not. To stop the system from doing so, see the instructions below.
- Click to Open Windows Store from the Start screen
- Press Windows Key + C to open Charms bar
- Go to Settings and find App Updates feature in it
- Locate Automatically Update My Apps and set it to No
- Save your changes and exit
With the help of these and many other tips and tricks, you can help yourself in overcoming the rebellious natured abilities of Windows 8.1. Once you are all over it, you will find it a very friendly and proficient operating system.
 Fix Windows 8.1 Black Screen Issue