Although, Windows 8 had many discontented users due to certain reasons. However, these users were very much in the favor of its speedy startup. After being upgraded to Windows 8.1, some of these partly satisfied consumers underwent an increase of time, while the Windows fire up. Some people perceive Windows 8.1 being responsible for this sluggishness, which is not the case. In fact, Windows 8.1 is assured to get going in fewer seconds than Windows 8. In this regard, there must be some answerable reasons behind the scenario that can be addressed to experience what Windows 8.1 is actually capable of.
For common PC issues, Junk files unclogging, boosting System performance, speeding up Internet and other underlying Windows concerns, we recommend using this tool.
- Step 1 : Download Systimizer ‒ PC Cleaner & Internet Booster (Effective with Windows 10, 8, 7 & XP)
- Step 2 : Click "Scan" to analyze your PC
- Step 3 : Click "Fix" to wipe out all bumps
In the section below, you will find different reasons, why Windows 8.1 takes too long to start up. Moreover, each of the described problems is accompanied with some instructions, which can be followed to make things correct on your own.
Switch to a Local Account
If you have already migrated to the latest update with a same username being used in Windows 8, you may need to change that. The update requires you to sign in to Windows 8 with a verified Microsoft user account. The difference between times taken by Windows 8.1 while logging in with a Microsoft Account and that with local account, is generally observed. While started with a live account, Windows 8.1 tends to synchronize your data and settings, which is time consuming. If you have nothing to do with cloud storage, Xbox music playlists, and Windows Store, you can sign off from the live account and switch as a confined user. This will surely reduce the startup time as it was promised, less than 10 seconds. See the instructions below and find out the way to go local.
- Bring up Charms bar and click the Settings icon on it followed by a click on Change PC settings
- Next, go for Accounts on the PC settings interface
- While in Your account menu, the sign in address can be viewed under your username
- Click Disconnect, stated under the email ID
- Enter the Current password to verify your email account and proceed with Next button
- The next screen, titled as Switch to a local account displays a form to be filled
- Enter all the required fields and click Next button
- Sign out and finish the wizard to get it done
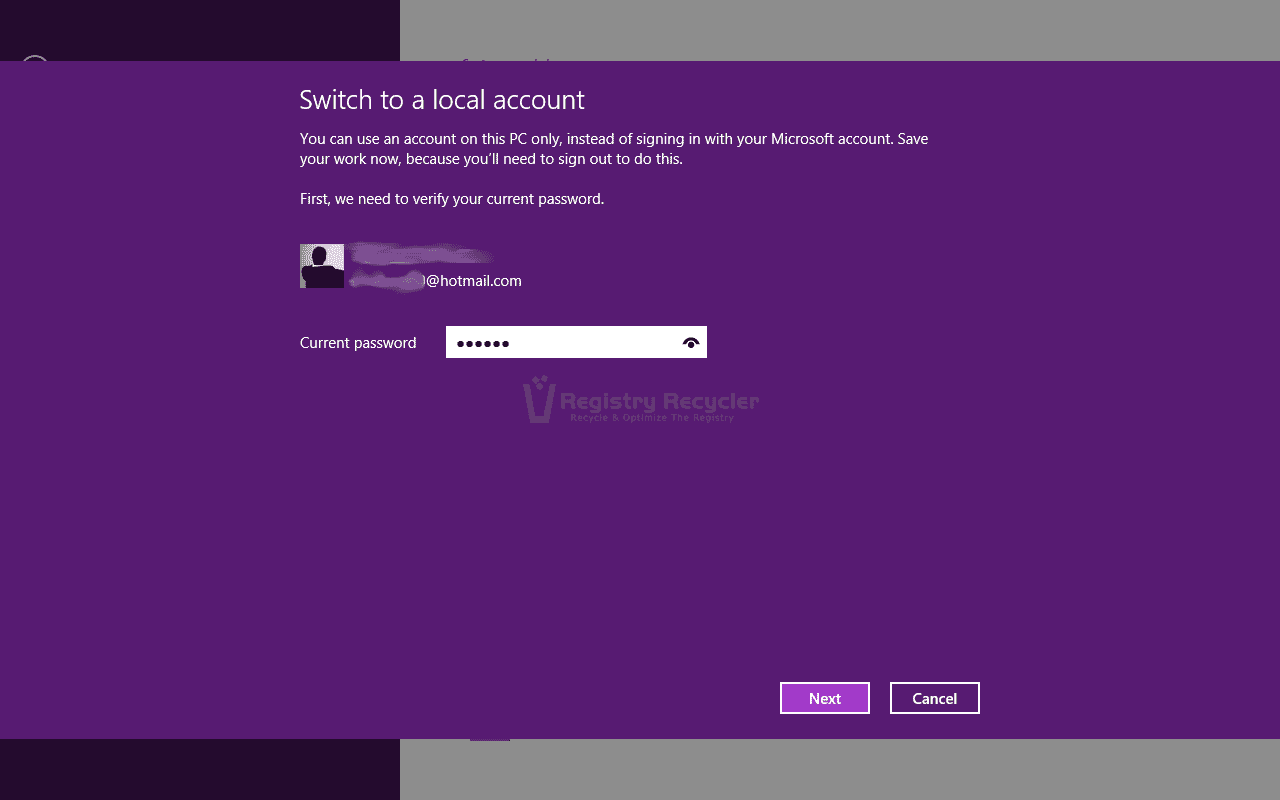
By this moment, you would have migrated from an online account. Now you can restart the computer and login with the local account to experience the least startup time taken by Windows 8.1.
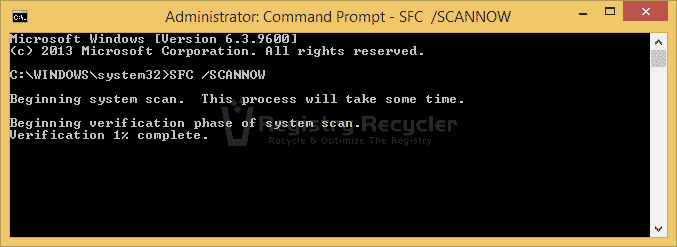
System File Checker
As mentioned by support staff in many threads of Microsoft Support forum, upgrading from Windows 8 to 8.1 may have gone rough with certain system files. While the system boots in, it moves through Windows 8.1 legitimate files to prepare session for the user. Although, this is the least considered reason causing a slow startup, it is still harmless to scan system files for errors. For this purpose, Microsoft embeds a free tool within your operating system, called System File Checker. Below is the procedure to access and use the tool.
- Go to Start screen and type Command Prompt to initiate a new Start search
- In the search results, right click Command Prompt and choose to Run as administrator
- In the next window, type command line SFC /SCANNOW and hit Enter key
- System file checker will start scanning the system files
- Please have patience, as the scan completes detecting and repairing the damaged system files
- Soon as the scan completes, restart the computer
Besides problematic system files, there could be other factors affecting the overall performance of Windows 8.1. These factors can be duly addressed and influenced to extract out the maximum output from your system. Find the ways to spot and fix slow performance issues after installing Windows 8.1.
Clean Boot
The subjected indolence might be a cause of applications and programs listing their selves in the startup list. As a result, the system loads each of these applications, soon as it boots up. Whether you want it or not, these unnecessary programs will eat up your system resources, making it slow. To realize if this is the reason of your annoyance, you can perform a clean boot and then a reboot. On the next Startup, notice the startup time. See below to learn performing a clean boot.
- On Charms bar click Search icon and type msconfig in the search box
- Open msconfig from the search results and go to its Services tab
- Check the option stating Hide all Microsoft services and click Disable all button
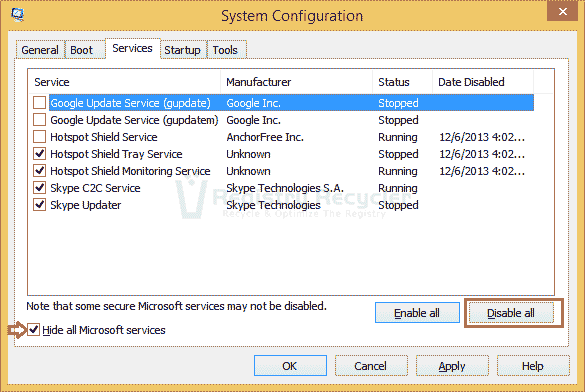
- Now go to the Startup tab and click the link saying Open Task Manager
- Select each item listed on this tab and click to Disable it
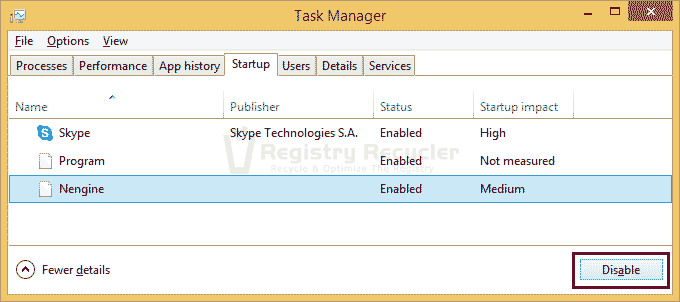
- Close Task Manager and click OK button on System Configuration window
Although, the recommendation provided herein is useful to get Windows started quickly, it will also help you with a swift performance of entire login session. In addition to clean boot, there are a number of other conducts to speed up your Windows 8.1 and resolve its performance issues.
SSD Settings
It is also reported that the new Windows 8.1 is found to have issues with SSD Drives. The clash appears to occur within Windows registry, when the update changes certain registry values. These changes are unfavorable for SSDs causing them to move at a slower pace. The modified registry values are vital for optimized solid-state drives and their value data needs to be reverted. These registry entries along with their prescribed value data are described in the steps below.
- Type regedit in the Start search and hit Enter to open Registry Editor
- Expand HKEY_LOCAL_MACHINE and navigate to the following key
- SYSTEM\CurrentControlSet\Control\Session Manager\Memory Management\PrefetchParameters
- Locate the DWORD Value named EnablePrefetcher and double click it to Modify
- Put 3 in the field next to Value data and click OK button
- Now stay in HKEY_LOCAL_MACHINE and navigate to the following key
- SYSTEM\CurrentControlSet\Control\WMI\Autologger\ReadyBoot
- Locate Start value on the right side and Modify it
- Set the Value data to 0 and click OK to save changes
- Close Registry Editor and Restart your system
Since, you are bringing back some of the changes Windows update brought into your system; you will notice some visible differences in the situation before and after carrying these tips. In case of SSDs, it is recommended not to defragment the drive, as it would reduce life of the hardware.
 Fix – Windows 10/8.1/8/7 Restarts Randomly