Memory (RAM) & Hard Disk Optimization in Windows 10 Fall Creators Update
PC Guides, Windows 10The word memory when used to describe something related to PCs can refer to a diverse variety of memories generally pigeonholed as physical memory like hard disk or RAM and virtual memory like paging file. For exceptional changes in PC speeds it is always recommended to upgrade the physical memory as much as possible. Installing more RAM or upgrading your HDD to an SSD can haul up speed of Windows 10 Fall Creator Update to the utmost capacity.
For common PC issues, Junk files unclogging, boosting System performance, speeding up Internet and other underlying Windows concerns, we recommend using this tool.
- Step 1 : Download Systimizer ‒ PC Cleaner & Internet Booster (Effective with Windows 10, 8, 7 & XP)
- Step 2 : Click "Scan" to analyze your PC
- Step 3 : Click "Fix" to wipe out all bumps
Nonetheless, tweaks and optimizations can be used in Windows 10 to augment performance and serve as an alternative to physically upgrading memory and storage devices.
Hard Drive Optimization
Hard drives being one of the most cardinal hardware components of the system require apposite maintenance for ensuring maximum efficiency. There are two kinds of fixed disk drives, Hard Disk Drive (HDD) and Solid State Drive (SSD). SSDs are the relatively new family on the block but are quickly taking over HDDs in personal computing with up to 50 percent better reading/writing speeds in comparison to HDDs, thanks to the non-volatile flash memory. HDDs are the most commonly used storage devices which entail regular maintenance.
Hard disk defragmentation and checking for errors and bad sectors are essential steps for ensuring better speeds.
Method 1: Hard Disk (HDD) Defragmentation
Defragmentation essentially is the process of physically organizing and efficiently positioning the data stored on the disk. It results in better system speeds and also frees up storage space. Disk defragmentation can be performed with ease using the Windows disk defragmentation app.
- Type ‘disk defragment’ in the search box
- Click to open Defragment and Optimize Drives
- After selecting the drive click Analyze
- When the analysis is complete, click Optimize

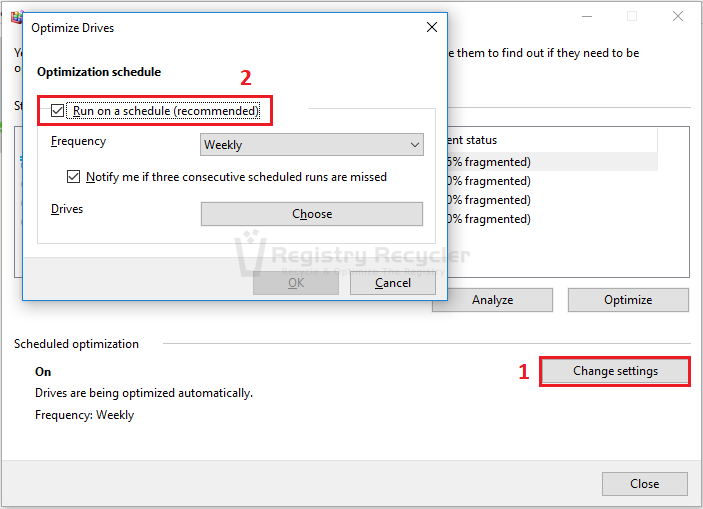
Disk defragmentation can also be scheduled for automatic carefree maintenance. Click on Change settings button to set a schedule.
Method 2: Checking HDD for Errors and Bad Sectors
Errors and bad sectors can have an unsympathetic effect on PC health. In addition to that it can cause critical damage to the user & system data stored on the disk. There are two approaches in Windows 10 (Fall Creators Update) to check for and fix such errors.
- Click on File Explorer icon in Taskbar
- Open This PC (aka My Computer)
- Right click the drive you intend to check
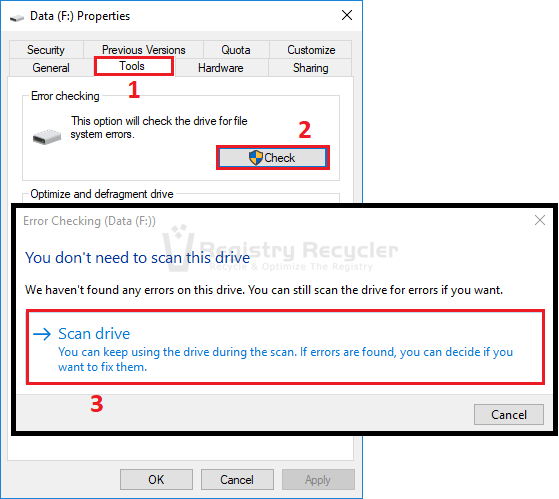
- Click Properties and go to Tools tab
- Click the button Check under Error checking section
- Select Scan drive and follow further on screen instructions
Note: Hard disk volumes that are in use like the partition that has the operating system installed cannot be accessed or repaired by the Disk Check app. When checking for errors within such volumes, instead of scanning right away you will be prompted to schedule a disk check on the next Windows boot.
Hard disk scan and error fixing can also be initiated via Command Prompt by following the mentioned instructions.
- Type ‘cmd’ in search box
- Right click Command Prompt and Run as administrator
- Confirm the UAC prompt with a Yes
- Type in ‘chkdsk E: /F’ and press Enter
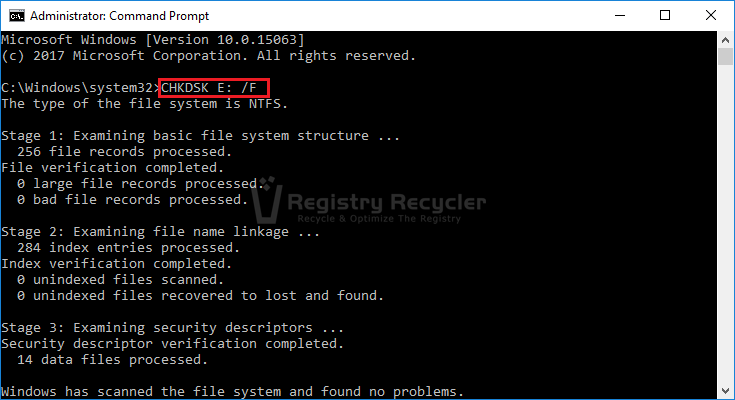
Note: CHKDSK is the command for scanning the disk and the parameter ‘/F’ at the end fixes errors on the given volume. Whereas ‘E’ in the above mentioned command refers to E Drive on disk. Check your drive letter and type accordingly.
Method 3: Optimizing SSDs
Solid State Drives (SSDs) are slowly eclipsing HDDs in today’s world due to their faster speeds, efficient power consumption and robust nature. SSDs unlike HDDs, which have a mechanical-arm to read and write data, rely on an embedded processor which makes them less prone to errors and are a lot less fragile both in terms of hardware and software.
Being flash memory storages, the only major influence in SSDs wearing out is the amount of writes. And though it sounds a little startling, modern SSDs last a lifetime. The focal maintenance regime for SSDs is ‘trimming’ which can be enabled or disabled in Windows 10 Fall Creators Update.
Read the script for detailed information on SSD trimming and optimization.
Boosting Random Access Memory (RAM)
Physically upgrading the RAM has no alternative that provides as much of a significant improvement in PC speed. Nevertheless optimizations to virtual memory can also sustain an overall better performance of Windows with options such as ReadyBoost and tweaking the paging file. Both these options reserve a part of the physical memory to be used as a kind of virtual Random Access Memory (RAM).
Method 1: ReadyBoost
ReadyBoost is an option in Windows that essentially converts any USB or similar forms of storage attached to the computer into virtual memory which is then used as the RAM. It enhances the memory capacity resulting in enhanced system speed and can be wielded with the given steps.
- Connect a USB or external memory storage to PC
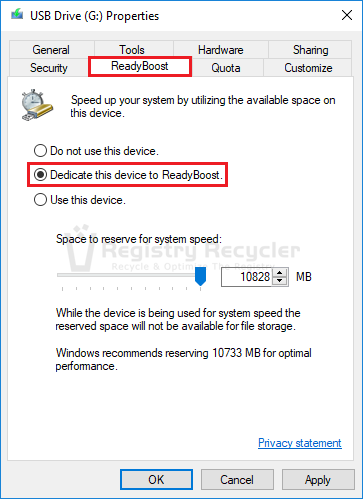
- Right click it and select Properties from the menu
- On the ReadyBoost tab, select Dedicate this device to ReadyBoost
- Click Apply and exit the Window by pressing OK
Method 2: Setting up a Paging file/Virtual Memory
Paging file work more or less similar to ReadyBoost. Instead of external memory storage pagefile reserves a portion of the hard disk to be used virtually as the RAM. Accessing data from the hard disk however is slower than the actual RAM but it can still provide a fair bit of increased PC optimization. To set up a paging file for PC.
- Type ‘advanced system settings’ in the search box
- Click View advanced system settings to open System Properties
- On the Advanced tab under Performance, click Settings
- Go to the Advanced tab and under Virtual memory click Change
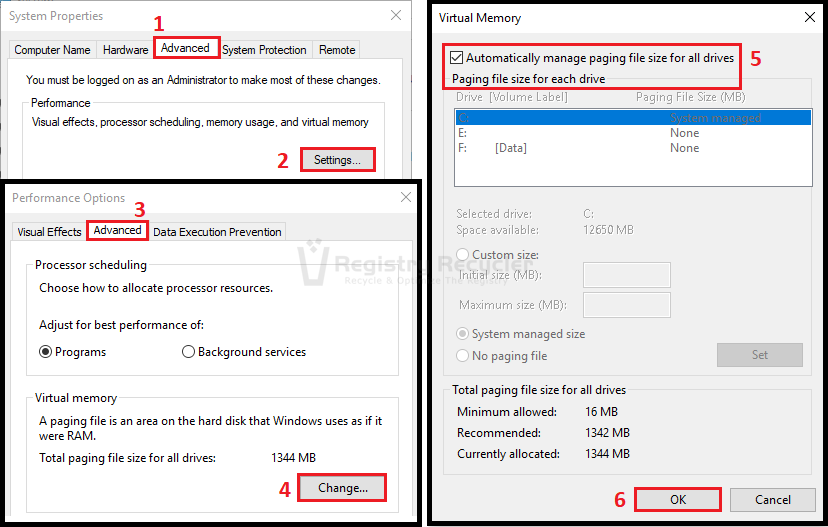
Note: Ideally, the option of Automatically manage paging file size for all drives should be checked to accord Windows to set the optimum paging file size automatically. The size can be set manually as well but too big or too small sizes might not be able to deliver significant performance increases.
Despite providing memory boosts, increasing virtual memory is not nearly as effective as installing/upgrading physical memory.
 Fix Slow Internet Speed in Windows 10 Creators Update