Internet is back-bone in all forms of technology of today’s world. In the millennia internet has taken over the traditional regime of application and software usage and taken it to a whole new era of cloud computing.
For common PC issues, Junk files unclogging, boosting System performance, speeding up Internet and other underlying Windows concerns, we recommend using this tool.
- Step 1 : Download Systimizer ‒ PC Cleaner & Internet Booster (Effective with Windows 10, 8, 7 & XP)
- Step 2 : Click "Scan" to analyze your PC
- Step 3 : Click "Fix" to wipe out all bumps
Today the functionality of our devices is directly in proportion with the quality and speed of our internet connection. A laptop or a tablet would be only as good as the internet being used on it when it comes to using applications and web services. The internet meme of testing a person’s true temperament by making him/her use a slow internet connection certainly holds its sarcastic depiction of how aggravating slow internet speeds can be.
Although Windows 10 particularly with the Creators Update aims at the being the finest Windows version till date and it does provide better options and a bunch of improved features and it takes care of all the housekeeping and updates by itself. However there are still tweaks and tools to further maximize the efficiency and performance of the internet.
- Resetting WinSock and Internet Protocols
- Disabling P2P (Peer-to-Peer) Windows Update Settings
- Disable Unnecessary Services and Applications
- Turning off Reserved Internet Bandwidth
- Turn off Windows 10 Updates
- Checking Network Adapters
Resetting WinSock and Internet Protocols
The internet functionality in spite of appearing to be a fairly simple process encompasses an intricate set of configurations of various Windows components. An important part of these settings are internet protocols which determine how Windows connects and toes the line to the internet. Similarly Winsock regulates input/output requests for internet applications. Errors and slip-ups in such settings can decelerate internet speeds.
Owing to the intricacy of these settings, using a trusted internet speed optimizing software is advised in order to maximize your internet swiftness minus the hassle of going through complicated commands.
On the other hand, to manually enhance and repair these parameters, proceed with the directives.
- Open search box by clicking Start menu
- Type ‘cmd‘, right click and select Run as administrator
- Type in ‘netsh winsock reset‘ and press Enter
- Type in ‘netsh int ip reset C:\RestLog.txt’ and Enter to reset TCP/IP Stack
- Type in ‘ipconfig /renew’ and press Enter to renew IP address
- Type ‘ipconfig /flushdns’ and press Enter to clear already stored DNS information
- A Windows reboot is required for the settings to apply
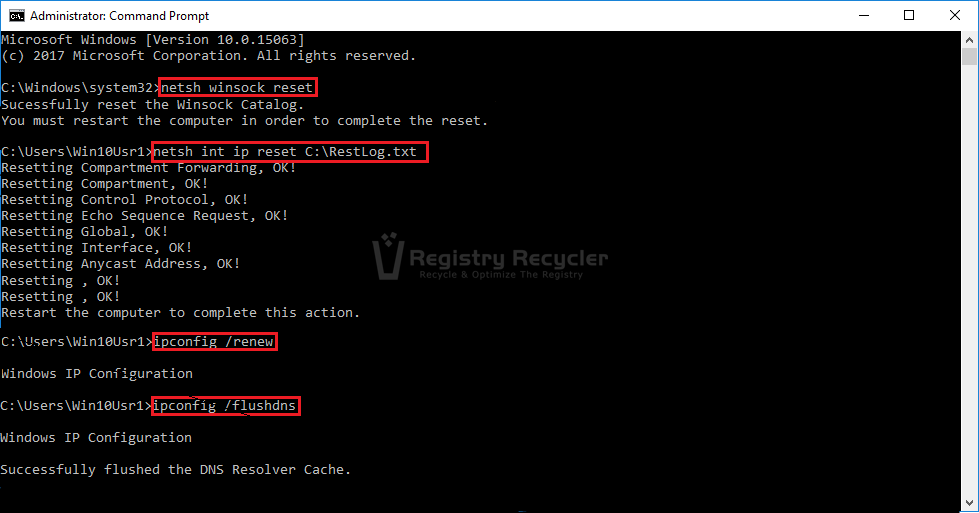
The IP addresses given by ISP’s DNS servers when a user accesses a website are information blocks that are stored on the users’ device. This stored information is called DNS Cache and it takes the blame for slow internet speeds in some cases. The above flushdns command clears out the DNS cache ensuring smooth internet experience.
Disabling P2P (Peer-to-Peer) Windows Update Settings
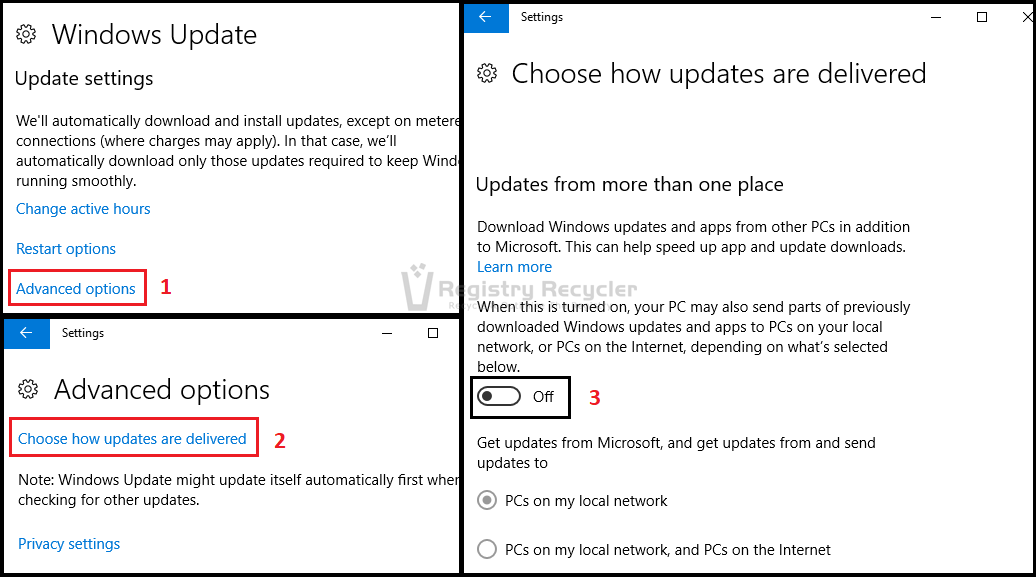
Primary designed for LAN sharing Creators Update by default supports a peer-to-peer (P2P) file sharing network that shares downloaded Windows Update files and Store apps to the internet. This can only be turned off manually. If not turned off it can affect internet speeds since it keeps sharing files in the background regardless. This can often cause disruption and high ping/latency, and specifically disturb gaming as it leeches on the upload bandwidth. Peruse the following instructions to address this issue.
- Click Start menu
- Go to Settings
- Click Updates & security
- Go to Advanced options
- Click Choose how updates are delivered
- Turn it Off
There is also an option for limiting p2p sharing for PCs only on your local network which can also be selected if necessary.
Disable Unnecessary Services and Applications
Third party Applications and softwares installed have update and maintenance processes running most of the time as background services. These uninvited guests usually drain the internet bandwidth to themselves therefore lessening the internet speed for foreground applications or browsing.
This problem can be tweaked by disabling unnecessary services and processes. Services can be blocked by Windows System Configuration (msconfig) tool.
- Click Start to open search box
- Type in ‘msconfig‘ and press Enter
- Then go to Services tab
- Check Hide all Microsoft services at the bottom of the window
- Then uncheck all unnecessary services
- Click Apply and OK
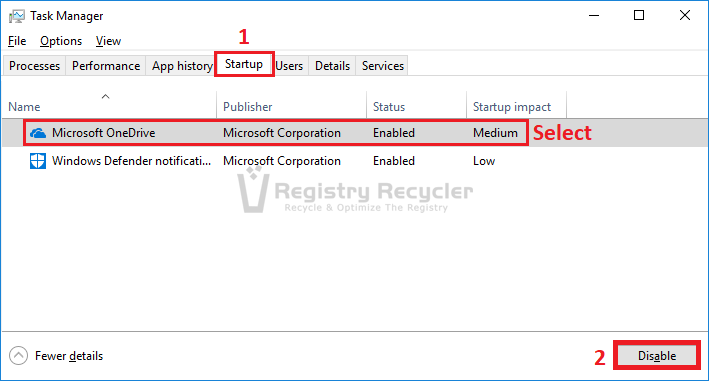
Use Task Manager to pin down applications
- Right click Taskbar and open Task Manager
- Go to Startup tab
- One by one select an unimportant App and click Disable
- Exit Task manager
Note: For outcome of these adjustments, a computer restart is requisite.
Turning off Reserved Internet Bandwidth
Just like its predecessors Windows 10 automatically reserves 20 percent of the internet bandwidth for the operating system itself. This leaves lesser bandwidth capacity for other applications and softwares. This can be turned off by editing the registry and hence being able to use maximum bandwidth reserves for foreground applications. Despite this being a plus point in the automatic installation and upgradation of Windows, it at times slows down the internet speed for other apps.
There are two approaches in solving this problem and turning off reserved internet bandwidth. One is through the Group Policy Editor and the other is done via the Windows Registry. For accessing the Group Policy Editor (not available in certain Windows editions) go through the following steps.
- Press Windows key + R to open Run dialogue box
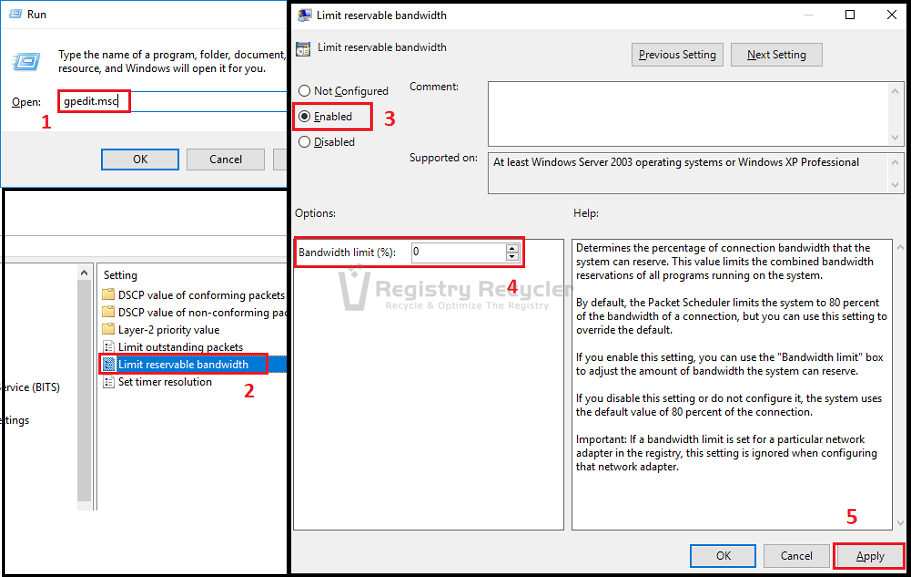
- Type ‘gpedit.msc’ and press Enter to open Local Group Policy Editor
- Navigate to and select QoS Packet Scheduler, via following path
Local Computer Policy\Computer Configuration\Administrative Templates\Network\QoS Packet Scheduler - Locate and select Limit reservable bandwidth entry from the right side
- Double click to edit
- Select the option Enabled then set the percentage of Bandwidth limit to ‘0’
- Click OK
- Close Local Group Policy Editor
Alternatively, the same results can be achieved by the following method through Windows Registry.
- Press Windows key + R to open Run dialogue box
- Type ‘regedit‘, press Enter to open Registry Editor
- On the left of the panel, navigate through HKEY_LOCAL_MACHINE to reach
SOFTWARE\Policies\Microsoft\Windows - Under Windows key, locate a sub key with the name Psched
- If it isn’t there, right click Windows key and select New to create a Key
- Name it Psched
- Right click Psched key to create a New DWORD Value
- Name it NonBestEffortLimit
- Double click NonBestEffortLimit to Modify
- Choose Decimal as Base and put a desired number (from 1 to 100) as Value data
- Exit and restart your computer
The number entered from 1-100 represents the value of the reserved bandwidth. For maximum internet speed make sure to enter a lower number so that less bandwidth is reserved for the operating system processes, thus making more bandwidth available for other user applications and softwares.
Turn off Windows 10 Updates
Microsoft with their present-day operating systems has a more automated approach towards trimness and maintenance, the same goes for Windows 10 Creators Update. All updates are automatically installed in the background with the intention of providing it’s users with an operating system which maintains and upgrades all by itself.
With the claim ease of use, this more often than not behind-the-scene simmering of updates can lead to problems in internet speeds especially if you don’t have a high speed internet connection.
The simplest solution in such cases is turning off Windows Updates temporarily to speed up internet for foreground Apps and softwares. There are 3 different methods to turn off Windows 10 Update service. Starting off with the simplest one,
- Click Start menu
- Go to Settings
- Click Updates & security
- Go to Advanced options
- Find and click Pause updates
- Exit Settings
This pauses Windows updates installation for a period of 35 days after which it is necessary to install all updates paused during this time. Until it makes sure all updates are installed, the option for re-pausing Windows updates remains unavailable.
An alternative is stopping Windows Update service by accessing Command Prompt. This can be done by going through the following steps.
- Type ‘cmd’ in Search and open Command Prompt as administrator
- Type in ‘net stop wuauserv’ and press Enter to disable Windows Update service
With the above command Windows Update service will remain stopped until accessed by any Windows component.
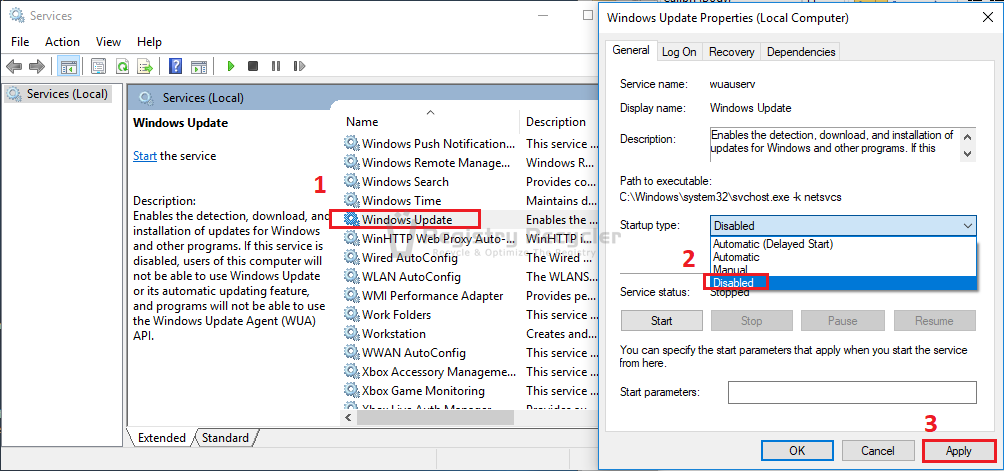
Windows Update service can also be turned off through the services app in Windows 10 Creators Update.
- In the search box type ‘services’ to open Services
- Scroll down and locate Windows Update
- Right click and go to Properties
- Click the Startup type dropdown
- Scroll down and select Disabled
- Click Apply then OK
- Exit Services
While not enabled manually the Update service will continue to be disabled.
Checking Network Adapters
Rarely though, internet speeds are affected by problems with network adapters. Old and outdated or even a problematic new update to the network drivers can lead to internet connectivity problems and speed issues.
In fixing such problems short steps can be taken to ensure the network adapters being used are in perfect shape. This includes updating network adapter drivers, uninstalling and then reinstalling the drivers or in some cases rolling back to working versions of previously installed drivers.
 Fix Windows 10 Creators Update WiFi and Internet Connectivity Issues