Fix Blue Screen – MULTIPLE IRP COMPLETE REQUESTS in Windows 8.1
PC Problems, Windows 8, Windows 8.1Denoted by the code, 0x44, MULTIPLE_IRP_COMPLETE_REQUESTS is a Stop (BSOD) error that indicates multiple requests to complete a single IRP (I/O request packet), consequently generating a harmful conflict. IRPs are kernel mode structures used by Windows Driver Model and Windows NT Device Drivers to lay effective communication grounds between themselves and the OS. When a module calls to run a packet that has already been completed, Windows fails to obey and eventually restarts in desperation.
For common PC issues, Junk files unclogging, boosting System performance, speeding up Internet and other underlying Windows concerns, we recommend using this tool.
- Step 1 : Download Systimizer ‒ PC Cleaner & Internet Booster (Effective with Windows 10, 8, 7 & XP)
- Step 2 : Click "Scan" to analyze your PC
- Step 3 : Click "Fix" to wipe out all bumps
So, what causes such bizarre requests? Commonly, they can attribute to either of the following:
- A driver attempted to complete its own packet twice
- Two separate drivers made the request, each believing the packet to be their own. While the first one will work, second will generate the issue
Given the unclear nature of this problem, diagnosing it is not as straightforward as one would expect. However, there are still effective routines that have proven to reap successful results, and eliminate the menace. This article serves as a guideline to demonstrate those key methods and fix MULTIPLE_IRP_COMPLETE_REQUESTS in Windows 8.1.
Method 1: View DMP Files
Generally, the first step to scrutinize any BSOD is to view dump files created during system crash. Found under Minidump folder, these files record valuable activities occurring prior to the episode, inching you closer towards the corrupt call.
Here’s how to reach these holders:
- Open Run box by pressing Windows + R keys
- Navigate to %systemroot%\Minidump path
- Notice the DMP File
To view the contained information, you need specific debugging tools. One program extensively used for this purpose is BlueScreenView. Download this software using online resources and use it to open/decipher these files. Identify the problematic identity listed under Caused by driver, and look for any updates available online. If found, make the appropriate updates to cure the error.
If the system is unable to create dump files, ensure the following configurations:
- Open Control Panel from Start Screen
- Click System and Security
- Select System
- Choose Advanced system settings from the left pane
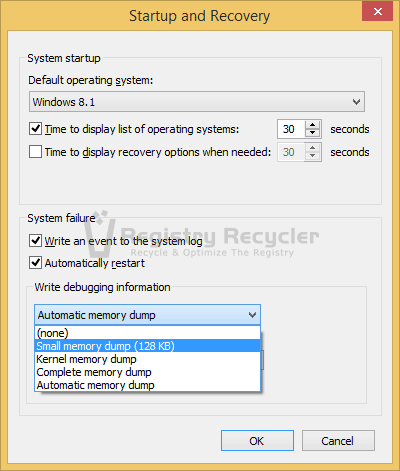
- Under Startup and Recovery, click Settings button
- Check Write an event to the system log
- Dropdown Write debugging information to Small memory dump (128 or 256 KB)
- Set Small dump directory to %SystemRoot%\Minidump
- Click OK
Method 2: Safe Mode + Clean Boot
Safe Mode is a troubleshooting style that loads only specific components and drivers to initiate the system. If the issue disappears under this setup, you can narrow down the list of startup items or device drivers to pinpoint the perpetrator in Clean Boot.
To access Safe Mode:
- Press Windows + I keys to open Settings charms bar
- Click Change PC settings located at the bottom
- Choose Update and recovery
- Select Recovery
- Locate Advanced startup from the list of options at the right
- Click Restart now
- Once in Advanced Startup Options, choose Troubleshoot
- Click Advanced options
- Select Startup Settings
- Click Restart and Enable Safe Mode by pressing the appropriate key on Startup Settings screen
Browse through the problematic activities and notice for any malfunctions. If you are still facing the problem, proceed to the next method. However, if the error does not reproduce, perform a Clean Boot to identify the troubling entity, and look for appropriate fixes available by its manufacturer:
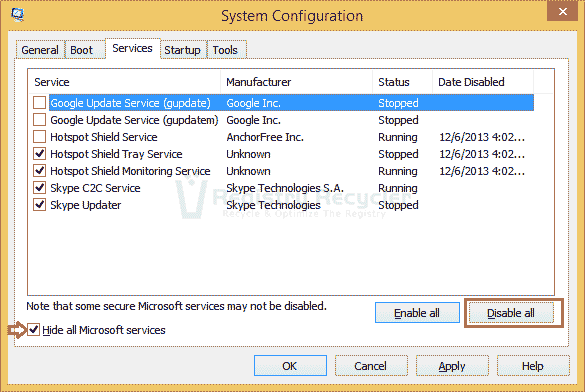
- Open msconfig using Run (Windows + R keys)
- Click Services tab
- Check Hide all Microsoft services
- Click Disable all and then Apply button
- Enter Startup tab
- Click Open Task Manager link
- Disable each item
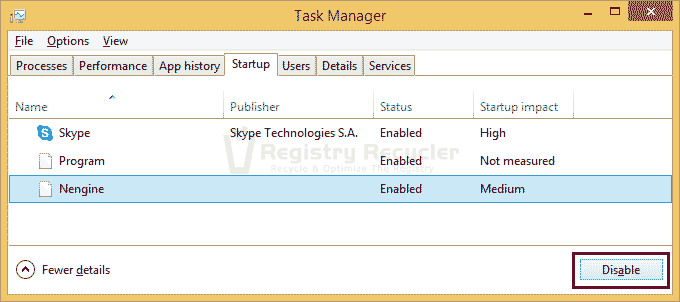
- Restart system
Once you have this clean boot environment, start enabling each service and startup item one-by-one till you can reproduce the error. If done successfully, notice the troubling module and either keep it disabled, or update it to heal the cause.
Method 3: Perform Windows Update
If you are unable to specify the root cause, it is best to allow Windows take care of the updates. Windows Update is a built-in feature that automatically installs important advancements as they become available online. To execute this important tool, here is what you should do:
- Point towards the top edge of your screen and choose Settings
- Click Change PC settings
- Navigate to Update and recovery
- Choose Check for updates now
Using the latest versions of drivers is the superlative resolution to this puzzling enigma. Below are a couple of possible driver identities commonly troubling PC users, and explanation on how they can be fixed. Refer to them and see if any suits your specific case:
Disabling Idle USB Device with KMDF-based Driver
When you disable a USB device that is currently idle, you may receive a “Stop 0x44” error message. This happens if the device runs on a driver using the Kernel Mode Driver Framework (KMDF) version 1.7 or earlier. Under these conditions, the framework does not wait for USB Selective Suspend Irps to be completed, thus allowing the device stack to be removed before the USB Selective Suspend Irp is completed.
This problem can be resolved by switching to the up-to-date driver releases. In Windows 8.1, driver developers need to develop with the KMDF 1.13 version.
LogMeIn Hamachi
LogMeIn is a hosted VPN service handy in network services, but a common culprit of 0x44. If you use this software to extend LAN-like networks to distributed items, mobile works etc. It is advised you try to remove Hamdrv.sys (LogMeIn Hamachi Virtual Miniport Driver) by uninstalling its concerned application LogMeIn. Restart your system and see if this resolves the issue. If it does, wait for the developers to come up with a fix.
After applying the above solutions, if you are still unable to work around this hazard, proceed with a PC Refresh. This will reinstall Windows and remove potential threats from the system.
Note: You will not lose personal files and settings
- Press Windows + I keys and choose Change PC settings
- Click Update and recovery
- Select Recovery
- Under Refresh your PC without affecting your files, click Get started
- Follow the instructions on screen
 KERNEL SECURITY CHECK FAILURE (0x139) BSOD Windows 8.1