KERNEL SECURITY CHECK FAILURE (0x139) BSOD Windows 8.1
PC Guides, PC Problems, Windows 8.1Novice or expert, getting a Blue Screen of Death is truly a dreadful experience for any PC user. In this case, the system performs a sudden reboot in attempt to prevent severe damages which can be caused by some grave computer error. The feeling further worsens when this starts happening in the latest Windows release of 8.1 Update. One similar fault dominating support forums across the world is the Kernel_Security_Check_Failure Stop error. Typically, this menace is caused by a faulty driver which tries to free the same kernel memory twice or access sensitive areas and overwrite into prohibited blocks. In other cases, the issue might result from a corrupt memory module or storage device usually RAM or Hard Drive.
For common PC issues, Junk files unclogging, boosting System performance, speeding up Internet and other underlying Windows concerns, we recommend using this tool.
- Step 1 : Download Systimizer ‒ PC Cleaner & Internet Booster (Effective with Windows 10, 8, 7 & XP)
- Step 2 : Click "Scan" to analyze your PC
- Step 3 : Click "Fix" to wipe out all bumps
Unfortunately, the problem is hard to track down because, by default, the checks are not executed when the bizarre requests are made, but some time later when Windows actually tries to free up blocks of memory. However, there are still effective methods that have proven to remove this delinquent disarray and help the system combat this disease successfully. Refer to the list of resolutions below and ensure safe recovery of your machine.
Method 1: Check OS Files
Firstly, you might want to verify your core Windows files. This is done by running the SFC command-line tool on an elevated window. Follow these steps to complete this task:
- Open Start Screen by hitting Windows key
- Type cmd and notice Command Prompt display on the results
- Right-click the black icon
- Choose Run as administrator from the list below. If prompted, click Yes on the UAC box
- In the elevated window, type the following command and press Enter
- SFC /SCANNOW
- Wait while the computer scans crucial files. No user intervention is required throughout the process
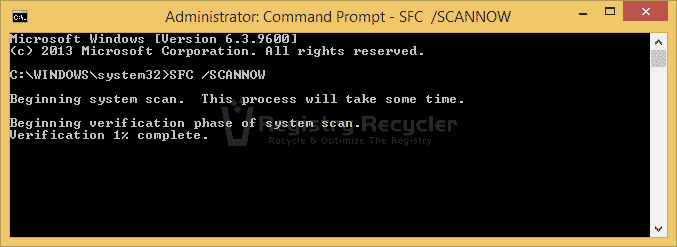
This procedure automatically scans and repairs any corrupt data hosted on your device. Once completed, see if the error disappears. Otherwise, proceed to the next solution.
Method 2: View Minidump Files
Typically located under C:\Windows\Minidump path, Minidump is a Windows folder that holds vital information crucial for effective troubleshooting. It records all activities occurring prior to the crash, helping the user pinpoint the problematic routine. To interpret these files, download & run BlueScreenView and notice the troubling identity. Once identified, refer to its developer’s website for further resolutions, or uninstall the component to fix your issue. However, if this method fails, continue with the next resolutions.
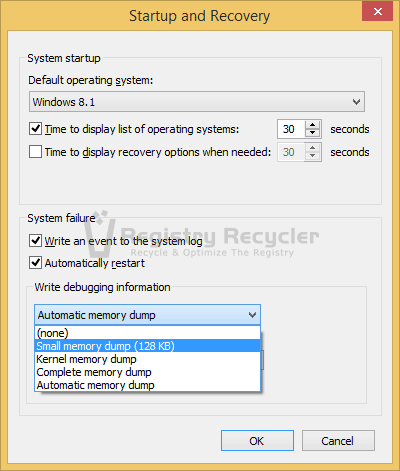
Note: If you are unable to view Minidump directory, ensure the following settings:
- Open Run box (Windows + R keys) and enter control panel
- Click System and Security
- Go to System
- Choose Advanced system settings from the options displayed at the left
- In System Properties box, click Advanced tab
- Under Startup and Recovery, click Settings button
- Check Write an event to the system log
- Dropdown Write debugging information to Small memory dump (128 KB)
- Set Small dump directory to %SystemRoot%\Minidump
- Click OK
Method 3: Run Memory Diagnostics Tool
As per our aforementioned explanation, defective memory components are one of the major reasons of this infamous error. Memory sticks can be scrutinized by running the Windows in-built Memory Diagnostics Tool. Here is what you should do:
- Search Settings by pressing Windows + W keys
- Type memory
- Click Diagnose your computer’s memory problems from the results
- Select Restart now and check for problems
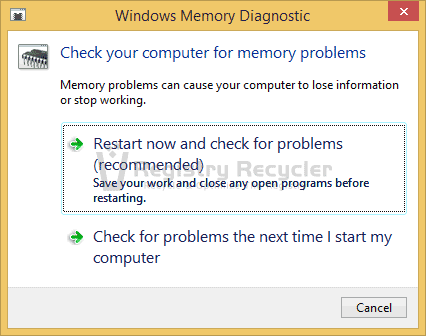
Warning: Save your work and close all running programs. Any unsaved data will be lost.
The tool will automatically start upon reboot. Once the test is completed, note down any detected errors and try the following remedial procedure:
- Rotate your RAM into new memory slots and see which module is faulty
- Test each module in all memory slots to find if one of the holders is damaged
- Replace your RAM or Motherboard according to the results. Contact your computer manufacturer for more support
Recommended Reading: Windows Memory (RAM) Optimization Tips and Tricks
Method 4: Check Hard Drive
An impaired hard drive can also lead to the Kernel error. This can be fixed by running a CHKDSK scan illustrated below:
- Open Command Prompt with administrative rights demonstrated before
- Type this command and hit Enter
- CHKDSK /R
- If prompted, schedule the scan to launch at computer next restart by entering Y
- Reboot your device
Allow Windows locate bad sectors and recover readable information from the drive. However, if you find this resolution unsuccessful in eliminating your concern, let’s see if you have outdated drivers causing this terrible suffering. Also, refer to hard drive optimization tips and tricks.
Method 5: Windows Update
Microsoft infuses a handy Update feature in all modern Windows versions, the Windows Update. Run this utility to automatically install any available updates and remove outdated/unsupported drivers leading to the error.
To do this, follow these steps:
- Hover your Mouse to the right-top corner of your screen and go down to click Search icon
- Choose Settings from the dropdown
- Type Windows Update and select it from the results
- Choose Check for updates from the left side
- If found, install all the updates
Method 6: Perform Virus Scan
Often, unsolicited guests hosting on your machine can prompt invalid memory requests, leading to dire problems. Therefore, make sure you keep your antivirus software updated with the latest happenings around the malware arena, and fight unwanted visitors residing on your computer. It would be helpful to schedule daily or weekly scans to ensure maximum protection.
Method 7: Perform System Restore
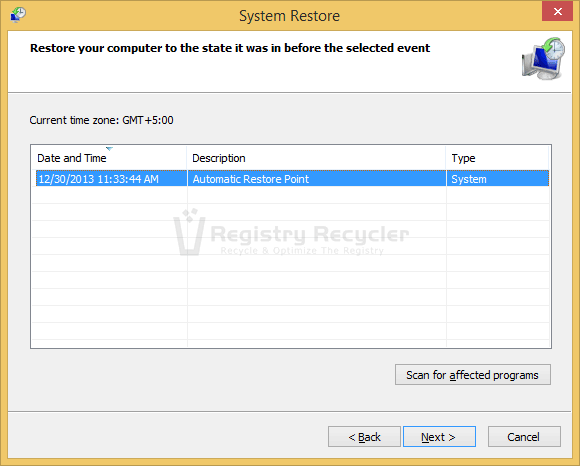
It is possible that you or some third-party software may have made undesirable setting’s change that is causing this mess. This could happen from a bad program or device install/uninstall, tampering crucial registry values, etc. To undo these alterations, use System Restore feature to revert to prior system configurations that were working just fine. This method is described here:
- Open Control Panel as before
- In the Search box, type Recovery and click its icon
- Choose Open System Restore
- Follow the wizard to guide you through a successful completion
After a restore, browse through your normal activities and notice for any malfunctions. If the BSOD happens to appear again, reinstall Windows using the PC Refresh option and remove this peril once-and-for-all.
To perform a PC Refresh, precede the steps:
- Press Windows + I to open Settings charm
- Choose Change PC settings
- Click Update and recovery
- Navigate to Recovery
- Under Refresh your PC without affecting your files, click Get started
- Follow on-screen instructions
 How to Make a Slow USB Flash Drive Faster